Tag Archives: Visualforce Page

Difference between Remote Action and Action Function in Salesforce

Here are some differences between apex:actionFunction and @RemoteAction.

Remote Action Function:

  • Remote Action is an Apex annotation used to mark a method as being available for javascript remoting.
  • Remote Action can call the apex methods from any apex class.
  • Remote Action allows you to call the method from javascript yourself and retrieve the result as a javascript object for manipulation.
  • Remote Action methods are static and global, hence don’t have access to your current controller variables and methods.
  • Remote Action methods require less bandwidth, and server processing time, because only the data you submit is visible and the view state is not transferred.
  • Remote Action methods have to update the DOM manually using explicit JavaScript.
  • Remote Action methods can return data directly back to the calling JavaScript, but cannot update the page’s view state.

Action Function:

  • Action Function is a Visualforce tag allows you to invoke a controller action from the Visualforce Page asynchronously via AJAX requests.
  • Action Function can call the apex methods only from the class linked to the Visualforce page.
  • Action Function doesn’t let you get retrieve data but you can rerender the page or a specific section of the page to update it with new values from the controller instance.
  • Action Function methods are instance methods, and so can see the entire page state.
    Action Function has to transfer the page view state.
  • Action Function methods automatically update the Visualforce DOM and can refresh part or all of the page, and can provide a standard interface for showing a loading status through apex:actionStatus.
  • Action Function methods can update the page’s view state, but cannot return data directly back to JavaScript (although you can do this with some extra effort using oncomplete).

In general, apex:actionFunction is easier to use and requires less code, while @RemoteAction offers more flexibility. Moreover, @RemoteAction helps in reducing View State size and also provides you near real time transaction.
.

How to redirect to the same VF page from the Constructor with parameters in Salesforce?

Sample Code:

Apex Class:

public with sharing class SampleClass{

    public SampleClass(){
    
    }
    public PageReference doRedirect(){
        String param = ApexPages.currentPage().getParameters().get('UserId');
        if(param == null || param == ''){
            String userId = UserInfo.getUserId();
            PageReference pageRef = new PageReference('/apex/TestPage1');
            pageRef.getParameters().put('UserId',userId);
            pageRef.setRedirect(true);
            return pageRef;
        }
        else{
            return null;
        }
    }
}

VF Page:

<apex:page controller="SampleClass" action="{!doRedirect}">
	<h1>Congratulations</h1>
	This is your new Page
</apex:page>

How to redirect to a different VF page from the constructor with parameters in Salesforce?

Sample Code:

Apex Class:

public with sharing class SampleClass{

    public SampleClass(){
    
    }
    public PageReference doRedirect(){
        String userId = UserInfo.getUserId();
        PageReference pageRef = new PageReference('/apex/TestPage2');
        pageRef.getParameters().put('UserId',userId);
        pageRef.setRedirect(true);
        return pageRef;
    }
}

VF Page:

<apex:page controller="SampleClass" action="{!doRedirect}">
	<h1>Congratulations</h1>
	This is your new Page
</apex:page>

Input Field Placeholder in Visualforce Page

We can use html-placeholder="name" attribute for input field placeholder in Visualforce Page.

Visualforce Page:

<apex:page standardController="Account">
    <apex:form>
        <apex:sectionHeader title="Account"/>
        <apex:pageBlock title="Account Information">
            <apex:pageBlockSection >
                <apex:inputField value="{!account.Name}" html-placeholder="Account Name"/>
                <apex:inputField value="{!account.AccountNumber}" html-placeholder="Account Number"/>
                <apex:inputField value="{!account.Site}" html-placeholder="Account Site"/>
                <apex:inputField value="{!account.Phone}" html-placeholder="Phone"/>
            </apex:pageBlockSection>         
        </apex:pageBlock>
    </apex:form>
</apex:page>

Output:

Field Set in Salesforce

A field set is a grouping of fields, you can use the field set in visualforce page to display group of fields in that page dynamically. No need to do code modifications to the page, In field set only you can add, remove & reorder fields. Generally these field sets are useful in managed packages. If the page is added to a managed package, administrators can add, remove, or reorder fields in a field set to modify the fields presented on the Visualforce page without modifying any code. Field sets are available for Visualforce pages on API version 21.0 or above. You can have up to 50 field sets referenced on a single page.

Here the below example is on a custom object “Project__c”.
To create a field set, go to object.
Create field set by clicking on new button in field set section.

Enter required fields and save.
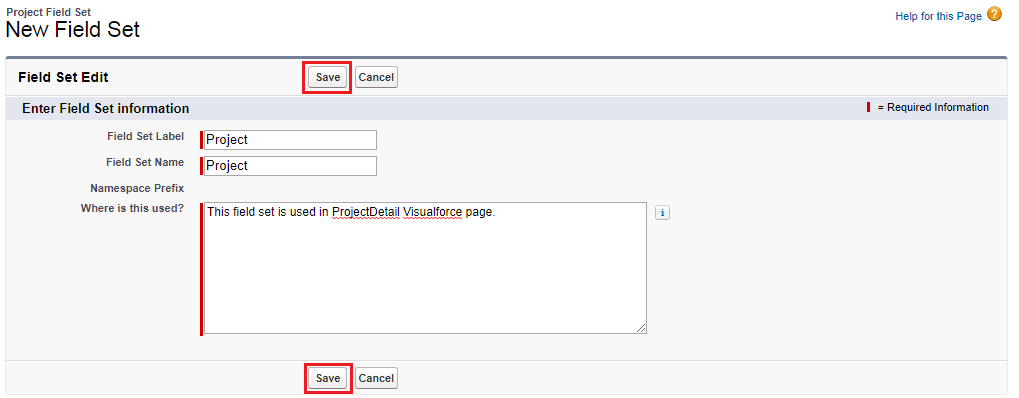
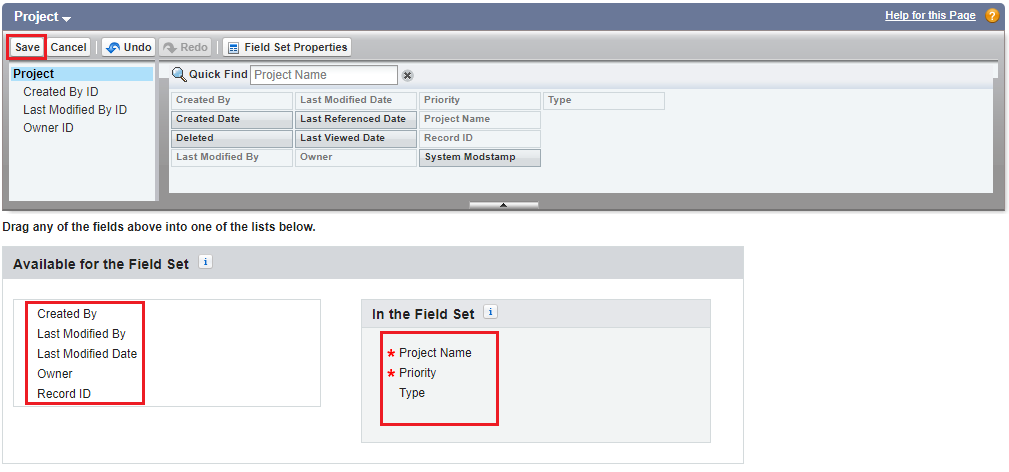
We will get below screen to add fields to field set, where We can drag and drop fields.
Add the necessary fields to field set and save it.
Property of Field Set:

Property Name Description
DBRequired Indicates whether the field is required for the
object
FieldPath Lists the field’s spanning info
Label The UI label for the field
Required Indicates whether the field is required in the field
set
Type The data type for the field

Working with Field Sets Using Visualforce:
Field sets can be directly referenced in Visualforce by combining the $ObjectType global variable with the keyword FieldSets. Here in below Visualforce page the above created Field Set is referenced.

<apex:page standardController="Project__c">
    <apex:form>
        <apex:pageblock>
            <apex:pageblockSection>
                <apex:repeat value="{!$ObjectType.Project__c.FieldSets.Project}" var="f"> 
                    <apex:inputField value="{!Project__c[f.fieldPath]}" required="{!OR(f.required, f.dbrequired)}"/>
                </apex:repeat>
            </apex:pageblockSection>
            <apex:pageBlockButtons location="bottom">
                <apex:commandButton value="Save" action="{!save}"/>
                <apex:commandButton value="Cancel" action="{!cancel}"/>
            </apex:pageBlockButtons>
        </apex:pageblock>
    </apex:form>
</apex:page>

The above code displays all fields in the field set. See the below screen to see the output of above code.
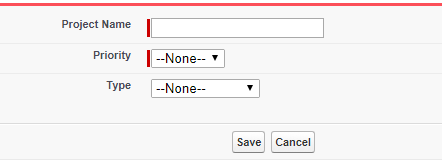
If this Visualforce page is added to a managed package and distributed, subscribers can edit the Project field set. The logic for generating the Visualforce page remains the same, while the presentation differs based on each subscriber’s implementation. To reference a field set from a managed package, you must prepend the field set with the organization’s namespace. Using the markup above, if Project comes from an managed package called TestManagedPackage, the field set is referenced like this:

{!$ObjectType.Project__c.FieldSets.TestManagedPackage__Project}

Working with Field Sets Using Apex:
Fields in a field set are automatically loaded when your Visualforce page uses a standard controller. When using a custom controller, you need to add the required fields to the SOQL query for the page. Apex provides two Schema objects that allow you to discover field sets and the fields they contain, Schema.FieldSet and Schema.FieldSetMember.

Here is an example to display a Field Set on a Visualforce Page using apex.

To dynamically get all the fields from “Project” Field Set we can use Schema.FieldSet and Schema.FieldSetMember methods.

Controller:

public class Sample{

    public Project__c proj { get; set; }
    
    public Sample() {
        this.proj = new Project__c();
    }

    public List<Schema.FieldSetMember> getFields() {
        return SObjectType.Project__c.FieldSets.Project.getFields();
    }
}

Visualforce Page:

<apex:page controller="Sample">
    <apex:form >
        <apex:pageBlock title="Project">            
            <apex:pageBlockSection>
                <apex:repeat value="{!fields}" var="f">
                    <apex:inputField value="{!proj[f.fieldPath]}" required="{!OR(f.required, f.dbrequired)}"/>
            </apex:repeat>
            </apex:pageBlockSection>
        </apex:pageBlock>
    </apex:form>  
</apex:page>

The above code displays all fields in the “Project” field set. See the below screen to see the output of above code.

Field Set Considerations:

  • Fields added to a field set can be in one of two categories:
    • If a field is marked as Available for the Field Set, it exists in the field set, but the developer hasn’t presented it on the packaged Visualforce page. Administrators can display the field after the field set is deployed by moving it from the Available column to the In the Field Set column.
    • If a field is marked as In the Field Set, the developer has rendered the field on the packaged Visualforce page by default. Administrators can remove the field from the page after the field set is deployed by removing it from the In the Field Set column.
  • The order in which a developer lists displayed fields determines their order of appearance on a Visualforce page.