Tag Archives: Lightning Component

Use Lightning Component in Visualforce Page

In Winter’16 the ability to add Lightning Components to Visualforce pages was made generally available. This powerful new feature allows you to reuse existing Lightning Components or design and implement new features as Lightning Components with the flexibility to use of them in new or existing Visualforce pages.

This article is to show you how to add Lightning components to Visualforce pages.

Let’s create a lightning component named “HelloWorld.cmp” either through developer console or through your IDE. Use the below mentioned code in your lightning component.

Lightning Component:

<!--HelloWorld-->
<aura:component implements="force:appHostable">
    <div>
        Hello World    
    </div>
</aura:component>

Now we use this Lightning component in a Lightning app. For this I recommend you to create a new Lightning app, let’s call it “HelloWorldApp.app” and use the above lightning component “HelloWorld.cmp” in this app.

Lightning App:

<!--HelloWorldApp-->
<aura:application extends="ltng:outApp" access="global">
    <aura:dependency resource="c:HelloWorld"/>
</aura:application>

In above Lightning app, I have used aura application access as global, so that it can be used anywhere in Salesforce organization like Visualforce. Extending ltng:outApp indicates that any component defined in this application can be used on Visualforce page.

Now create a VisualForce page which would display this lightning component. VisualForce page would provide the interface where we can view the lightning component that we are going to use in the page. Use the below code in your VF page.

In my Visualforce page, we have a special include apex:includeLightning for Lighting. We also need to create a container div id="LightningContainer" for the Lightning components to appear in.

Visualforce Page:

<apex:page >
    <apex:includeLightning />
    <div style="width:100%;height:100px;" id="LightningContainer" />
    
    <script>
        $Lightning.use("c:HelloWorldApp", function() {
            $Lightning.createComponent("c:HelloWorld", { },
            "LightningContainer",
            function(cmp) {
                console.log('Component created');
            });
        });
    </script>
</apex:page>

Note: If your Org has a namespace, then in Visualforce page we have to mention the namespace for Lightning app as yournamespace:HelloWorldApp instead of c:HelloWorldApp.

Here is the Visualforce page output:

Call Multiple Apex Methods in Lightning Controller

Apex Controller:

public with sharing class AccountController {

    @AuraEnabled
    public static Account getAccount(Id accountId) {
        Account acc = new Account();
        acc = [SELECT Id, Name, Description FROM Account WHERE Id=:accountId];
        return acc;
    }
    
    @AuraEnabled
    public static List<Attachment> getAttachments(Id parentId) {                            
        List<Attachment> listAttachment = new List<Attachment>();
        listAttachment = [SELECT Id, Name FROM Attachment WHERE ParentId = :parentId];
        return listAttachment;
    }
}

Lightning Component:

<aura:component controller="AccountController" implements="force:appHostable,flexipage:availableForAllPageTypes,force:hasRecordId" access="global">
    <aura:attribute name="recordId" type="Id" />
    <aura:attribute name="acc" type="Account"/>
    <aura:attribute name="attachments" type="Attachment[]"/>
    <aura:handler name="init" value="{!this}" action="{!c.doInit}" />
    
    <div>
        <div>{!v.acc.Name}</div>
        <div>{!v.acc.Description}</div>
        
        <ul>
            <aura:iteration items="{!v.attachments}" var="a">
                <li>
                    <a target="_blank" href="{! '/servlet/servlet.FileDownload?file=' + a.Id }">{!a.Name}</a>
                </li>
            </aura:iteration>
        </ul>
    </div>

Lightning Controller:

({
    doInit : function (component) {
    var action = component.get('c.getAccount');
    action.setParams({
        "accountId": component.get("v.recordId")
    });
        
	action.setCallback(this, function(response) {
        var state = response.getState();
        if (state == "SUCCESS") {
            var account = response.getReturnValue();
            component.set("v.acc", account);
        }
    });
        
    var action2 = component.get('c.getAttachments');
    action2.setParams({
        "parentId": component.get("v.recordId")
    });
        
	action2.setCallback(this, function(response) {
        var state = response.getState();
        if (state == "SUCCESS") {
            var attachments = response.getReturnValue();
            component.set("v.attachments", attachments);
        }
    });
    $A.enqueueAction(action);
    $A.enqueueAction(action2);
}
})

Adding and Removing Styles on a Component During Runtime

You can add or remove a CSS style on a component or element during runtime. You can use the $A.util.addClass(cmpTarget, 'class') method to append CSS classes and $A.util.removeClass(cmpTarget, 'class') method to remove CSS classes from a component or element.

And you can use component.find('myCmp').get('v.class') method to retrieve the class name on a component, where myCmp is the aura:id attribute value.

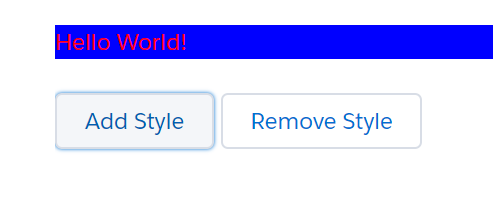
Here is an example to adding and removing Styles on a Component during runtime.

Component:

<aura:component>    
    <div aura:id="hwDiv">Hello World!</div><br />
    <lightning:button onclick="{!c.addCSS}" label="Add Style" />
    <lightning:button onclick="{!c.removeCSS}" label="Remove Style" />
</aura:component>

JS Controller:

({
    addCSS: function(cmp, event) {
        var cmpDiv = cmp.find('hwDiv');
        $A.util.addClass(cmpDiv, 'changeStyle');
    },
    
    removeCSS: function(cmp, event) {
        var cmpDiv = cmp.find('hwDiv');
        $A.util.removeClass(cmpDiv, 'changeStyle');
    }  
})

CSS Stylesheet:

.THIS.changeStyle {
    background-color:blue;
    color:red;
}

Output:

Get Salesforce Community Page URL Parameters in Lightning Component

Community URL:
https://testcommunity.my.salesforce.com/communityname/ProfilePage?id=00Q0I00000xUjMH&name=biswajeet

Lightning JS Controller:

({
    getParamValue: function(component, event, helper) {

        //Get Id Parameter Value From Community URL
        var idParamValue = helper.getURLParameterValue().id;
        console.log('Id-' + idParamValue);

        //Get Name Parameter Value From Community URL
        var nameParamValue = helper.getURLParameterValue().name;
        console.log('Name-' + nameParamValue);
    }
})

Lightning JS Helper:

({
    getURLParameterValue: function() {

        var querystring = location.search.substr(1);
        var paramValue = {};
        querystring.split("&").forEach(function(part) {
            var param = part.split("=");
            paramValue[param[0]] = decodeURIComponent(param[1]);
        });

        console.log('paramValue-' + paramValue);
        return paramValue;
    }
})

Custom File Upload In Salesforce Lightning Component

File Upload Component:
Create a new Lightning Component FileUpload.cmp.

<!--FileUpload.cmp-->
<aura:component controller="FileUploadController">
    <!-- 'parentId' Aura Attribute for store the Id for Parent Record where we are attach our file -->  
    <aura:attribute name="parentId" type="Id" default="00128000002KuXUAA0" />
    <!-- 'fileName' attribute for display the selected file name -->  
    <aura:attribute name="fileName" type="String" default="No File Selected.." />
    
    <!-- Lightning Input with file type and on file change call the 'handleFilesChange' controller --> 
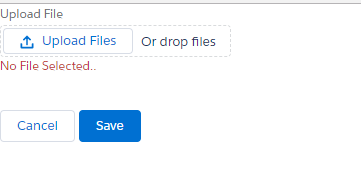
    <lightning:input aura:id="fuploader" onchange="{!c.handleFilesChange}" type="file" name="file" label="Upload File" multiple="false"/>
    <div class="slds-text-body_small slds-text-color_error">{!v.fileName} </div>
    <br/>
    <lightning:button label="Cancel" onclick="{!c.handleCancel}" class="slds-m-top--medium" />
    <lightning:button label="Save" onclick="{!c.handleSave}"
                      variant="brand" class="slds-m-top--medium"/>
</aura:component>


File Upload JavaScript Controller:

Now create below JavaScript FileUploadController.js controller for above FileUpload.cmp component.

({    
    handleSave: function(component, event, helper) {
        if (component.find("fuploader").get("v.files").length > 0) {
            helper.uploadHelper(component, event);
        } else {
            alert('Please Select a Valid File');
        }
    },
    
    handleFilesChange: function(component, event, helper) {
        var fileName = 'No File Selected..';
        if (event.getSource().get("v.files").length > 0) {
            fileName = event.getSource().get("v.files")[0]['name'];
        }
        component.set("v.fileName", fileName);
    },
    
    handleCancel: function(component, event, helper) {
        $A.get("e.force:closeQuickAction").fire();
    }
})

File Upload JavaScript Controller Helper:
Now create below JavaScript FileUploadHelper.js helper for above FileUploadController.js component.

({
    MAX_FILE_SIZE: 4500000, //Max file size 4.5 MB 
    CHUNK_SIZE: 750000,      //Chunk Max size 750Kb 
    
    uploadHelper: function(component, event) {
        // get the selected files using aura:id [return array of files]
        var fileInput = component.find("fuploader").get("v.files");
        // get the first file using array index[0]  
        var file = fileInput[0];
        var self = this;
        // check the selected file size, if select file size greter then MAX_FILE_SIZE,
        // then show a alert msg to user,hide the loading spinner and return from function  
        if (file.size > self.MAX_FILE_SIZE) {
            component.set("v.fileName", 'Alert : File size cannot exceed ' + self.MAX_FILE_SIZE + ' bytes.\n' + ' Selected file size: ' + file.size);
            return;
        }
        
        // create a FileReader object 
        var objFileReader = new FileReader();
        // set onload function of FileReader object   
        objFileReader.onload = $A.getCallback(function() {
            var fileContents = objFileReader.result;
            var base64 = 'base64,';
            var dataStart = fileContents.indexOf(base64) + base64.length;
            
            fileContents = fileContents.substring(dataStart);
            // call the uploadProcess method 
            self.uploadProcess(component, file, fileContents);
        });
        
        objFileReader.readAsDataURL(file);
    },
    
    uploadProcess: function(component, file, fileContents) {
        // set a default size or startpostiton as 0 
        var startPosition = 0;
        // calculate the end size or endPostion using Math.min() function which is return the min. value   
        var endPosition = Math.min(fileContents.length, startPosition + this.CHUNK_SIZE);
        
        // start with the initial chunk, and set the attachId(last parameter)is null in begin
        this.uploadInChunk(component, file, fileContents, startPosition, endPosition, '');
    },
    
    
    uploadInChunk: function(component, file, fileContents, startPosition, endPosition, attachId) {
        // call the apex method 'SaveFile'
        var getchunk = fileContents.substring(startPosition, endPosition);
        var action = component.get("c.SaveFile");
        action.setParams({
            parentId: component.get("v.parentId"),
            fileName: file.name,
            base64Data: encodeURIComponent(getchunk),
            contentType: file.type,
            fileId: attachId
        });
        
        // set call back 
        action.setCallback(this, function(response) {
            // store the response / Attachment Id   
            attachId = response.getReturnValue();
            var state = response.getState();
            if (state === "SUCCESS") {
                // update the start position with end postion
                startPosition = endPosition;
                endPosition = Math.min(fileContents.length, startPosition + this.CHUNK_SIZE);
                // check if the start postion is still less then end postion 
                // then call again 'uploadInChunk' method , 
                // else, diaply alert msg and hide the loading spinner
                if (startPosition < endPosition) {
                    this.uploadInChunk(component, file, fileContents, startPosition, endPosition, attachId);
                } else {
                    alert('File has been uploaded successfully');
                }
                // handel the response errors        
            } else if (state === "INCOMPLETE") {
                alert("From server: " + response.getReturnValue());
            } else if (state === "ERROR") {
                var errors = response.getError();
                if (errors) {
                    if (errors[0] && errors[0].message) {
                        console.log("Error message: " + errors[0].message);
                    }
                } else {
                    console.log("Unknown error");
                }
            }
        });
        // enqueue the action
        $A.enqueueAction(action);
    }
})

File Upload Apex Controller:
Create below apex controller to use it in FileUpload.cmp component.

public with sharing class FileUploadController {
    
    @AuraEnabled
    public static Id SaveFile(Id parentId, String fileName, String base64Data, String contentType) {
        base64Data = EncodingUtil.urlDecode(base64Data, 'UTF-8');
        Attachment attach = new Attachment();
        attach.parentId = parentId;
        attach.Body = EncodingUtil.base64Decode(base64Data);
        attach.Name = fileName;
        attach.ContentType = contentType;
        Insert attach;
        return attach.Id;
    }
}

File Upload App:

<!--FileUploadApp.app-->
<aura:application extends="force:slds">
    <c:FileUpload />    
</aura:application>

Output: