Tag Archives: Attachment

Attach Dynamic Attachment to Salesforce Email Template

Sometimes we need to attach dynamic attachment to a Salesforce email template. So, following are the steps to create dynamic attachments for an email template.

  • Create a Visualforce Page and an apex controller to generate a PDF document.
  • Create a Visualforce Page Component and an apex controller for Visualforce Email Template.

VF Page for PDF(ProposalPDF):

<apex:page controller="ProposalPDFController" applyHtmlTag="false" applyBodyTag="false" showHeader="false" sidebar="false">
    <html>
        Proposal Name:  <apex:outputText value="{!Opp.Name}" escape="false"/><br/>
        Proposal For:  <apex:outputText value="{!Opp.Account.Name}" escape="false"/><br/>
        Proposal Amount:  <apex:outputText value="{!Opp.Amount}" escape="false"/><br/>
    </html>
</apex:page>

Apex Controller for PDF VF Page(ProposalPDFController):

public class ProposalPDFController {
    
    public String OpportunityId {
        get{
            if(OpportunityId == null && ApexPages.currentPage().getParameters().get('id') != null){
                OpportunityId = ApexPages.currentPage().getParameters().get('id');
            }
            return OpportunityId;
        }
        set;
    }
    
    public Opportunity Opp {
        get{
            return [SELECT Id, Name, Account.Name, Amount  FROM Opportunity WHERE Id = :OpportunityId LIMIT 1];
        }
        set;
    }
}

VF Page Component for VF Page Email Template(ProposalAttachment):

<apex:component controller="ProposalAttachmentController" access="global">
    <apex:attribute name="oppId" description="Opportunity Record Id" assignTo="{!opportunityId}" type="Id" />
    <apex:outputText value="{!PagePDFContent}" escape="false" />
</apex:component>

Apex Controller for VF Page Component(ProposalAttachmentController):

global class ProposalAttachmentController {
    
    global String PagePDFContent{ get; set; }
    global String opportunityId{ 
        get; 
        set {
            UpdatePDFContent(value);
        } 
    }
    
    public void UpdatePDFContent(String opportunityId) {
        try {
            PageReference pageRef = Page.ProposalPDF;
            pageRef.getParameters().put('id', opportunityId);
            PagePDFContent = pageRef.getContent().toString().replace('<html style="display:none !important;">', '<html>');
        }catch(System.Exception ex){}
    }
}

Note: The Email Template can be used for Workflow Rule, Process Builder, Approval Process, Flow etc.
Send Email With Document As An Attachment Using Apex In Salesforce

Sample Code Approach 1:

//Get your document from document Object
Document doc = [Select Id, Name, Body, ContentType, DeveloperName, Type From Document Where DeveloperName = 'Your_Doucment_DeveloperName'];

//Create Email file attachment from document
Messaging.EmailFileAttachment attach = new Messaging.EmailFileAttachment();
attach.setContentType(doc.ContentType);
attach.setFileName(doc.DeveloperName+'.'+doc.Type);
attach.setInline(false);
attach.Body = doc.Body;

//Apex Single email message
Messaging.SingleEmailMessage mail = new Messaging.SingleEmailMessage();
mail.setUseSignature(false);
mail.setToAddresses(new String[] { 'itzbiswajeet@gmail.com' });//Set To Email Address
mail.setSubject('Test Email With Attachment');//Set Subject
mail.setHtmlBody('Please find the attachment.');//Set HTML Body
mail.setFileAttachments(new Messaging.EmailFileAttachment[] { attach });//Set File Attachment
Messaging.sendEmail(new Messaging.SingleEmailMessage[] { mail });//Send Email

Sample Code Approach 2:

//Get your document from document Object
Document doc = [Select Id, Name, Body, ContentType, DeveloperName, Type From Document Where DeveloperName = 'Your_Doucment_DeveloperName'];

//Apex Single email message
Messaging.SingleEmailMessage mail = new Messaging.SingleEmailMessage();
mail.setUseSignature(false);
mail.setToAddresses(new String[] { 'itzbiswajeet@gmail.com' });//Set To Email Address
mail.setSubject('Test Email With Attachment');//Set Subject
mail.setHtmlBody('Please find the attachment.');//Set HTML Body
mail.setDocumentAttachments(new Id[]{doc.Id});//Set Document Attachment
Messaging.sendEmail(new Messaging.SingleEmailMessage[] { mail });//Send Email

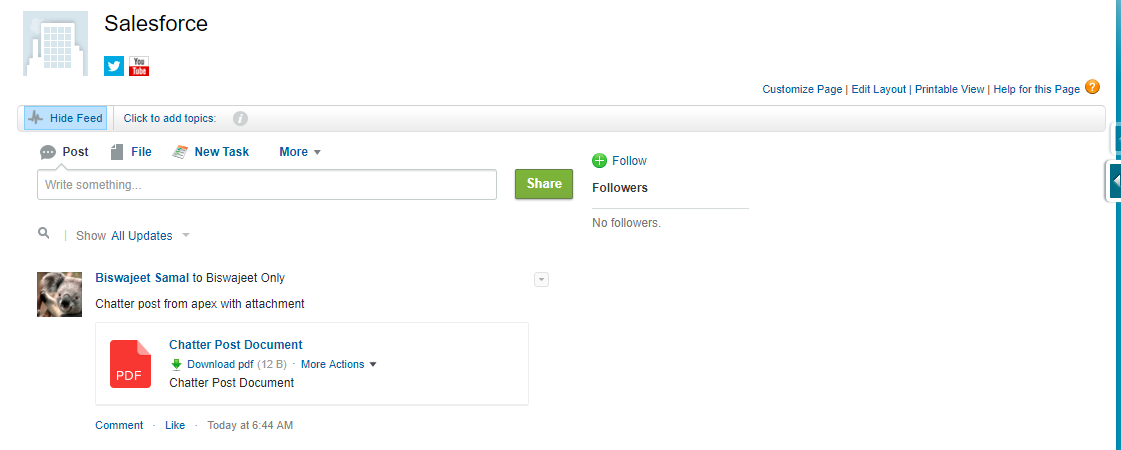
Create Chatter Post With Attachment Using Apex

Sample Code:

//Upload File
ContentVersion cv = new ContentVersion();
cv.Title = 'Chatter Post Document';//File title
cv.PathOnClient = 'chattertestdoc.pdf';//File name
cv.VersionData = Blob.valueOf('Test Content');//File body (Add content or body of uploaded file)
cv.Description = 'Chatter Post Document';//File description
insert cv;

//Create Chatter Post
FeedItem fi = new FeedItem();
fi.Body = 'Chatter post from apex with attachment';
fi.ParentId = '0010I00002AbcMm'; //Record Id
insert fi;

//Associate attachment to the post
FeedAttachment fa = new FeedAttachment();
fa.FeedEntityId = fi.Id;//Chatter Post Id
fa.RecordId = cv.Id;//Document Id
fa.Type = 'CONTENT'; 
insert fa;

Upload Multiple Files Using Lightning File Upload Component

In Winter ’18 Salesforce released a new lightning component lightning:fileUpload, which provides an easy and integrated way for users to upload multiple files. The file uploader includes drag-and-drop functionality and filtering by file types.

File Upload Component Limits:

  • By default, you can upload up to 10 files simultaneously unless your Salesforce admin has changed that limit.
  • The org limit for the number of files simultaneously uploaded is a maximum of 25 files and a minimum of 3 files.
  • The maximum file size you can upload is 2 GB. In Communities, the file size limits and types allowed follow the settings determined by community file moderation.

Considerations:

  • This component is not supported in Lightning Out or standalone apps, and displays as a disabled input.
  • The file uploader cannot be used to upload files with the following file extensions: .htm, .html, .htt, .htx, .mhtm, .mhtml, .shtm, .shtml, .acgi, .svg.

In this article I will show you how you can upload multiple files using lightning file upload component, without writing the apex code.

FileUpload Component:
Create a new Lightning Component FileUpload.cmp.

<!--FileUpload.cmp-->
<aura:component controller="FileUploadController" implements="force:appHostable, flexipage:availableForAllPageTypes, flexipage:availableForRecordHome, force:hasRecordId, forceCommunity:availableForAllPageTypes, force:lightningQuickAction" access="global">
    
    <lightning:fileUpload label="Upload File" multiple="true" accept=".pdf, .png" recordId="{!v.recordId}" aura:id="multifileUpload" onuploadfinished="{!c.handleUploadFinished}" />
</aura:component>

FileUpload JavaScript Controller:
Now create below JavaScript FileUploadController.js controller for above FileUpload.cmp component.

({    
    handleUploadFinished: function (cmp, event) {
        //Get the list of uploaded files
        var uploadedFiles = event.getParam("files");
        //Show success message – with no of files uploaded
        var toastEvent = $A.get("e.force:showToast");
        toastEvent.setParams({
            "title": "Success!",
            "type" : "success",
            "message": uploadedFiles.length+" files has been uploaded successfully!"
        });
        toastEvent.fire();
        
        $A.get('e.force:refreshView').fire();
        
        //Close the action panel
        var dismissActionPanel = $A.get("e.force:closeQuickAction");
        dismissActionPanel.fire();
    }
})

Steps to test the functionality:
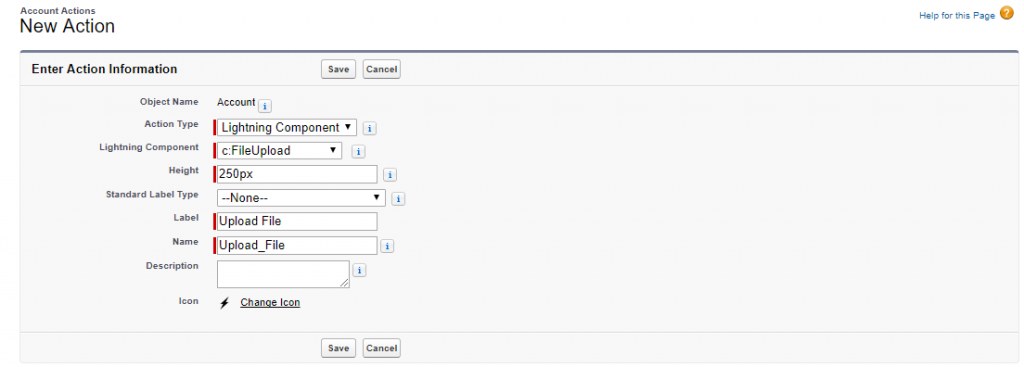
Go to Setup || Object Manager || Select Object(For example Account) || Buttons, Links, and Actions || New Action || Create Quick Action

Now add the created Quick Action into Object Page Layout.
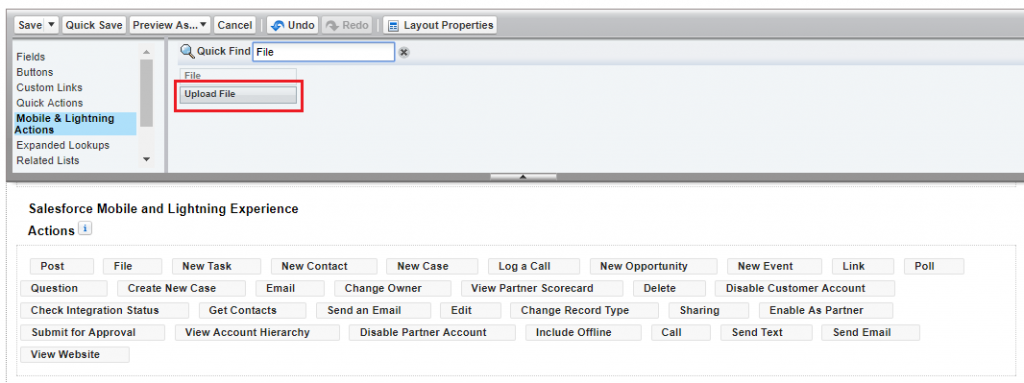
Go to Setup || Object Manager || Select Object(For example Account) || Page Layouts || Select Your Layouts (For example Account Layout) || Select Mobile & lightning Actions || Add the Quick Action into Salesforce Mobile & Lightning Experience Actions section.

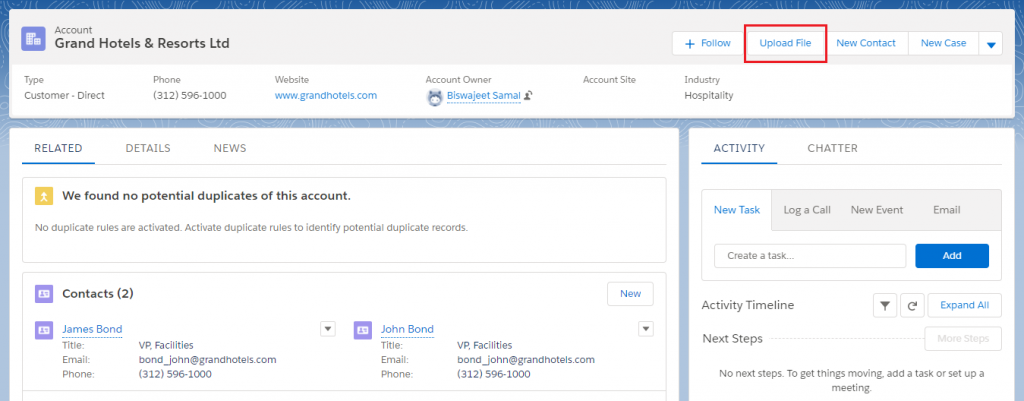
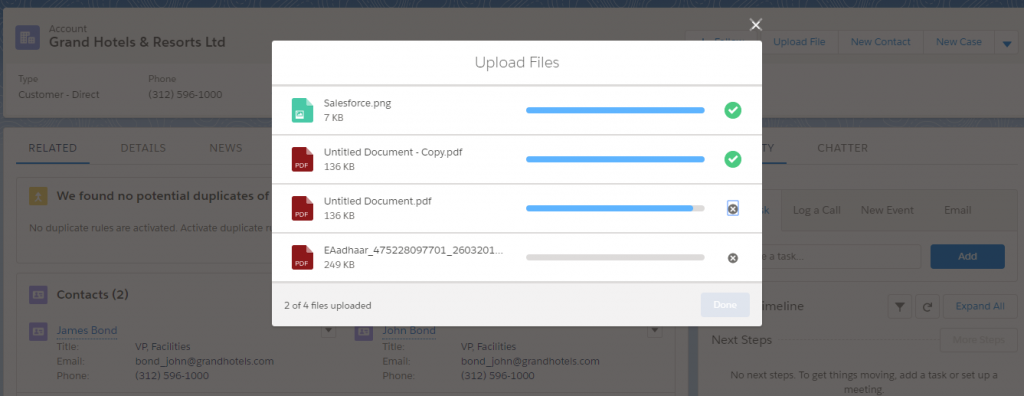
Now, Open an account record click Upload File action from right upload files and try to upload file.

Convert Attachment to File in Salesforce Using Apex

Salesforce introduced Files related list in Winter’16, and now Salesforce is going to replace Notes and Attachment section with Files. Basically, Files that you upload to the Notes & Attachments related list on records in Salesforce Classic are now Salesforce Files objects, rather than the old attachment objects.

Sometimes you may have requirement to move attachment documents to file using apex. Before creating Files in Salesforce you have to understand the Object relationship. Here is an example to create File from Attachment using apex.

ContentDocument: This object record you don’t have to create. It gets created when you create ContentVersion which is the child of ContentDocument.

ContentVersion: This object stores document information similar like Attachment.

ContentDocumentLink: This object will share the files with Users, Records, Groups etc. You can create multiple records to attach the same files under multiple records.

Sample Code:

//Get attachment
Attachment attach = [SELECT Id, Name, Body, ContentType, ParentId From Attachment LIMIT 1];

//Insert ContentVersion
ContentVersion cVersion = new ContentVersion();
cVersion.ContentLocation = 'S'; //S-Document is in Salesforce. E-Document is outside of Salesforce. L-Document is on a Social Netork.
cVersion.PathOnClient = attach.Name;//File name with extention
cVersion.Origin = 'H';//C-Content Origin. H-Chatter Origin.
cVersion.OwnerId = attach.OwnerId;//Owner of the file
cVersion.Title = attach.Name;//Name of the file
cVersion.VersionData = attach.Body;//File content
Insert cVersion;

//After saved the Content Verison, get the ContentDocumentId
Id conDocument = [SELECT ContentDocumentId FROM ContentVersion WHERE Id =:cVersion.Id].ContentDocumentId;

//Insert ContentDocumentLink
ContentDocumentLink cDocLink = new ContentDocumentLink();
cDocLink.ContentDocumentId = conDocument;//Add ContentDocumentId
cDocLink.LinkedEntityId = attach.ParentId;//Add attachment parentId
cDocLink.ShareType = 'I';//V - Viewer permission. C - Collaborator permission. I - Inferred permission.
cDocLink.Visibility = 'InternalUsers';//AllUsers, InternalUsers, SharedUsers
Insert cDocLink;