Tag Archives: Apex Trigger

Subscribe to Change Events Using an Apex Trigger

We can subscribe to change events using Apex triggers. The change event trigger fires when one or a batch of change events is received. Change event trigger is not like object triggers, it runs asynchronously after the database transaction is completed. The asynchronous execution makes change event triggers ideal for processing resource-intensive business logic while keeping transaction-based logic in the object trigger. Change event triggers can help reduce transaction processing time.

Here is an example on Lead object Change Event Trigger.

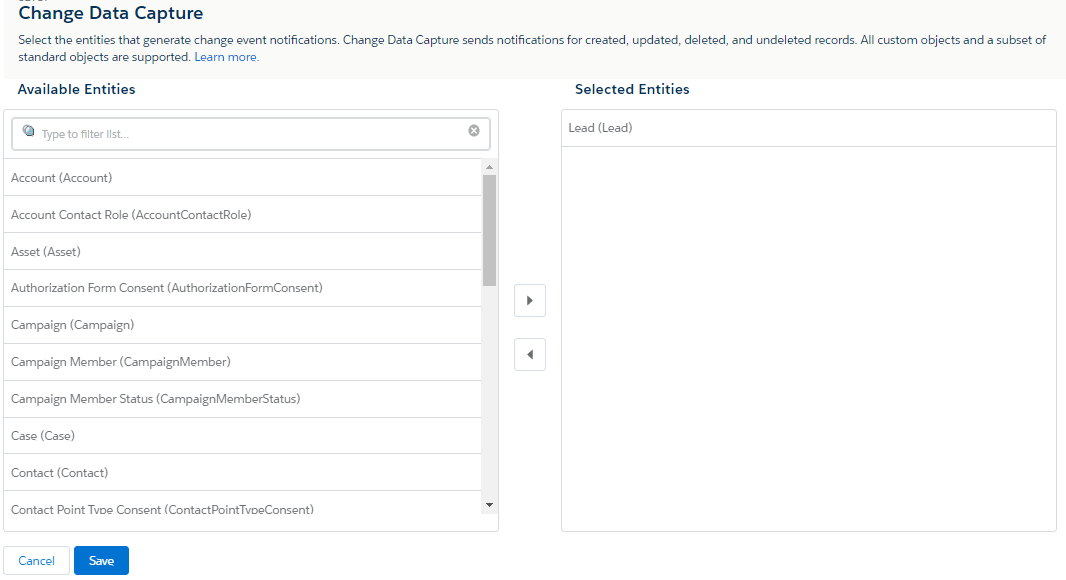
Enable Change Data Capture:

Go to Setup | Enter Change Data Capture in the Quick Find box, and click Change Data Capture | In Available Entities, select Lead object and click the > arrow |
Click Save.
Create Change Event Trigger:
Go to Developer Console
Select File | New | Apex Trigger
In the Name field, enter a name for the trigger. e.g. “LeadChangeTrigger”
From the dropdown, select the change event object for the Lead object “LeadChangeEvent”.
The trigger will be created with the after insert keyword.

trigger LeadChangeTrigger on LeadChangeEvent (after insert) {
    
    System.debug('Lead Change Event Trigger');
    
    //Iterate through each event message.
    for (LeadChangeEvent event : Trigger.New) {
        //Get event header fields
        EventBus.ChangeEventHeader header = event.ChangeEventHeader;
        
        switch on header.changeType {
            when 'CREATE'{
                //Craete logic
                System.debug('CREATE');
                break;
            }
            when 'UPDATE'{
                //Update logic
                System.debug('UPDATE');
                break;
            }
            when 'DELETE'{
                //Delete logic
                System.debug('DELETE');
                break;
            }
            when 'UNDELETE'{
                //Undelete logic
                System.debug('UNDELETE');
                break;
            }
        }
    }
}

Test Change Event Trigger:
To ensure that Salesforce record changes in a test method fire change event triggers, enable all entities for Change Data Capture by calling Test.enableChangeDataCapture() at the beginning of the test. This method enables all entities only for the test and doesn’t affect the Change Data Capture entity selections for the org.

After enabling Change Data Capture, perform some DML operations and then call the Test.getEventBus().deliver() method. The method delivers the event messages from the test event bus to the corresponding change event trigger and causes the trigger to fire.

@isTest
private class TestLeadChangeTrigger {
    
    static testmethod void testLeadChange() {
        //Enable all Change Data Capture entities for notifications.
        Test.enableChangeDataCapture();
        
        //Insert a Lead test record
        Insert new Lead(FirstName = 'Biswajeet',
                        LastName = 'Samal',
                        Company = 'Salesforce');
        //Call deliver to fire the trigger and deliver the test change event.
        Test.getEventBus().deliver();
        
        //Update Lead record
        Lead leadRecord = [SELECT Id, FirstName, LastName, Company FROM Lead LIMIT 1];
        leadRecord.Company = 'google';
        Update leadRecord;
        //Call deliver to fire the trigger for the update operation.
        Test.getEventBus().deliver();
        
        //Delete Lead record
        Delete leadRecord;
        //Call deliver to fire the trigger for the delete operation.
        Test.getEventBus().deliver();
        
        //Undelete Lead record
        Lead deletedLead = [SELECT Id, IsDeleted FROM Lead WHERE Id = :leadRecord.Id ALL ROWS];
        Undelete deletedLead;
        //Call deliver to fire the trigger for the undelete operation.
        Test.getEventBus().deliver();
    }
}  

Debug Change Event Trigger:
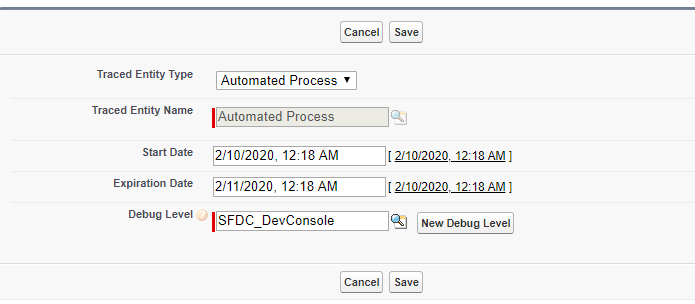
To enable debug logs for Change Event Trigger, we have to setup Entity Type as Automated Process then only we can view the debug log. Or we can deselect “Show My Current Log Only” checkbox in developer console to get the log in developer console.
Salesforce Apex TriggerOperation Enum

The System.TriggerOperation enum has the following values:

  • BEFORE_INSERE
  • AFTER_INSERT
  • BEFORE_UPDATE
  • AFTER_UPDATE
  • BEFORE_DELETE
  • AFTER_DELETE
  • AFTER_UNDELETE

The new Trigger context variable Trigger.operationType will return System.TriggerOperation enum during trigger context.

If you combine this new context variable and the new Apex switch feature, trigger code becomes much easy to implement and understand.

Sample Switch and enum in Triggers:

trigger AccountTrigger on Account(before insert, after insert, before update, after update, before delete, after delete, after undelete) {
    
    switch on Trigger.operationType {
        
        when BEFORE_INSERT {
            //Invoke before insert trigger handler
            system.debug('Before Insert');
        }
        when AFTER_INSERT {
            //Invoke after insert trigger handler
            system.debug('After Insert');
        }
        when BEFORE_UPDATE {
            //Invoke before update trigger handler
            system.debug('Before Update');
        }
        when AFTER_UPDATE {
            //Invoke after update trigger handler
            system.debug('After Update');
        }
        when BEFORE_DELETE {
            //Invoke before delete trigger handler
            system.debug('Before Delete');
        }
        when AFTER_DELETE {
            //Invoke after delete trigger handler
            system.debug('After Delete');
        }
        when AFTER_UNDELETE {
            //Invoke after undelete trigger handler
            system.debug('After Undelete');
        }
    }
}

Delete Apex Class or Trigger in Salesforce Production Org Using Eclipse

It is not possible to directly delete an Apex class or trigger after it has been deployed to production. Here are the steps to delete apex class or trigger in Salesforce Production Org by using eclipse and Force.com IDE.

  • Download and Install the Force.com IDE for Eclipse.
  • Connect to the Salesforce Production org.
  • Download the apex class/trigger.
  • Open the meta.xml file of the Apex class/trigger.
  • Change the status of the Apex class/trigger to Deleted.
  • Save and deploy to server.

Note: Apex class status can only be changed to “Active” or “Deleted” and not “Inactive”.

Avoid Recursive Trigger Calls In Salesforce

Recursion occurs when same code is executed again and again. It can lead to infinite loop and which can result to governor limit sometime. Sometime it can also result in unexpected output or the error “maximum trigger depth exceeded”. So, we should write code in such a way that it does not result to recursion.

For example, I’ve a trigger on Account object, which will be execute on before Update and after Update. In after Update I’ve some custom logic to update Account records. So, when I’m updating the Account records in After Update, it is throwing error “maximum trigger depth exceeded”. So, it is a recursion in apex trigger.

To avoid the situation of recursive call, we have to write code in such a way that the trigger will execute one time. To do so, we can create a class with a static Boolean variable with default value true. In the trigger, before executing the code keep a check that the variable is true or not.

Here in below trigger, I want to execute both before and after Update trigger only one time. I’m checking the static Boolean variable is true in both before and after Update trigger. In after update trigger changed the variable to false and after updating the account records, again changed the variable to true. In this way you can handle bulk of records in recursive trigger.

Apex Class:

public Class AccountTriggerHelper{
    //Trigger execution check variable
    public static Boolean runOnce = true;
    
    //On before update
    public void onBeforeUpdate(map<Id, Account> mapNewAccount, map<Id, Account> mapOldAccount){
        //Write your logic here
        System.debug('Is Before Update');
    }
    
    //On after update
    public void onAfterUpdate(map<Id, Account> mapNewAccount, map<Id, Account> mapOldAccount){
        Update [SELECT Id, Name FROM Account WHERE Id IN: mapNewAccount.keyset()];
        AccountTriggerHelper.runOnce = true;
        System.debug('Is After Update');
    }
}

Apex Trigger:

trigger AccountTrigger on Account(before Update, after Update) {
    
    AccountTriggerHelper helper = new AccountTriggerHelper();
    
    if(Trigger.isBefore && Trigger.isUpdate && AccountTriggerHelper.runOnce){
        helper.onBeforeUpdate(Trigger.newMap, Trigger.OldMap);     
    }
    
    if(Trigger.isAfter && Trigger.isUpdate && AccountTriggerHelper.runOnce){
        AccountTriggerHelper.runOnce = false;
        helper.onAfterUpdate(Trigger.newMap, Trigger.OldMap);
    }
}

Debug Log:

Check Case Owner is a User or Queue

Check Case Owner in Apex Class.

//Check object Id in Apex 
if(string.valueOf(c.OwnerId).startsWith('005')){
    //Owner is User       
}

if(string.valueOf(c.OwnerId).startsWith('00G')){
    //Owner is Queue
}

Check Case Owner in Apex Trigger.

//In Apex Trigger
for (Case objCase : Trigger.new) { 
    If (objCase.OwnerID.getsobjecttype() == User.sobjecttype) {
        /*Code if Owner is User*/
    }
    else{
        /*Code if Owner is Queue*/ 
    }
}

Check Case Owner by SOQL query.

//By Query Owner.Type Field
List<Case> caseList = [SELECT Id, CaseNumber, OwnerId, Owner.Name, Owner.Type FROM Case];

for (Case objCase : caseList){
    If (objCase.Owner.Type == User.sobjecttype) {
        /*Code if Owner is User*/
    }
    else{
        /*Code if Owner is Queue*/ 
    }
}

Check Case Owner in Process Builder.

//Check in Process Builder
BEGINS([Case].OwnerId, "005") //Check Owner is User
BEGINS([Case].OwnerId, "00G") //Check Owner is Queue