Pass Visualforce Page URL Parameter To Lightning Component

Lightning Component:

<!--SampleComponent.cmp--> 
<aura:component implements="flexipage:availableForAllPageTypes,force:appHostable" access="global">
    <!--Declare Attributes-->
    <aura:attribute name="accountId" type="String" />
    <!--Declare Handlers-->
    <aura:handler name="init" value="{!this}" action="{!c.doInit}"/>
</aura:component>

Lightning JS Controller:

({
    doInit : function(component, event, helper) {
        var accountId = component.get("v.accountId");
        alert('Account Id-' + accountId);
    }
})

Lightning App:

<!--SampleApp.app--> 
<aura:application extends="ltng:outApp" access="global">
    <!--Lightning component-->
    <aura:dependency resource="c:SampleComponent"/>
</aura:application>

Visualforce Page:

<apex:page sidebar="false" showHeader="false">
    <apex:includeLightning />
    <!--Lightning Container-->
    <div style="width:100%;height:100px;" id="LightningContainer"/>
    
    <script type="text/javascript">
    //get account Id from URL
    var accountId = "{!$CurrentPage.parameters.id}";
    
    //Create Lightning Component
    $Lightning.use("c:SampleApp", function() {
        $Lightning.createComponent("c:SampleComponent", 
                                   { "accountId" : accountId }, //Pass Parameter
                                   "LightningContainer", function(component) {
                                       console.log('Component created');
                                   });
    });
    </script>
</apex:page>

URL : https://yourorgurl/apex/SampleVFPage?id=0010I00001dPxYL
Quick Text in Salesforce

Quick text is predefined messages, like greetings, answers to common questions, and short notes. Which helps to stop retyping the same message over and over and save time. You can insert quick text in emails, chats, and more.

Enable Quick Text:

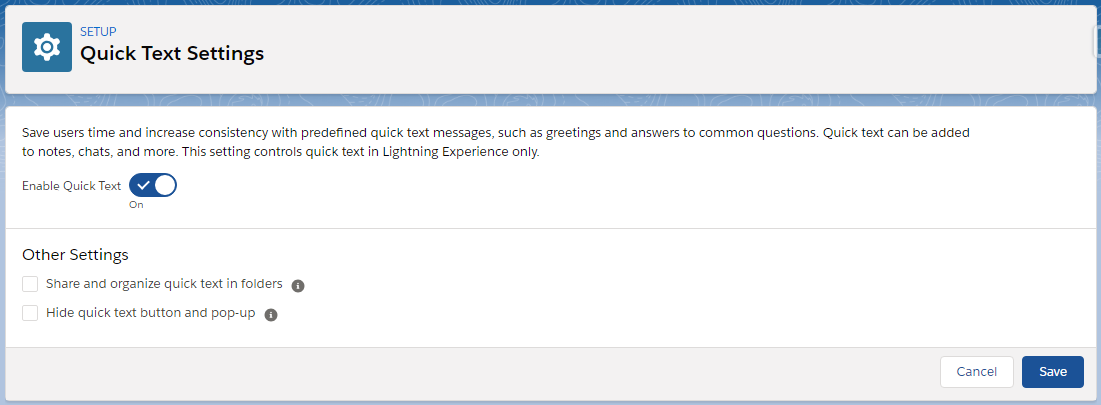
  • From Setup enter Quick Text Settings in the Quick Find box
  • Select Quick Text Settings
  • Click Enable Quick Text
  • Save

Give Users Access to Quick Text:
Giving users access to quick text lets them insert predefined messages in their emails, chats, events, tasks, Knowledge articles, and more. Service agents can respond to customers and update cases quickly and easily. Sales reps can work with their contacts, accounts, and opportunities more efficiently.

Use a permission set or update profiles to give your users Read permission on the Quick Text object. Optionally, you can also give users Create, Edit, and Delete access to let them create and manage their own quick text messages.

Create Quick Text Messages:
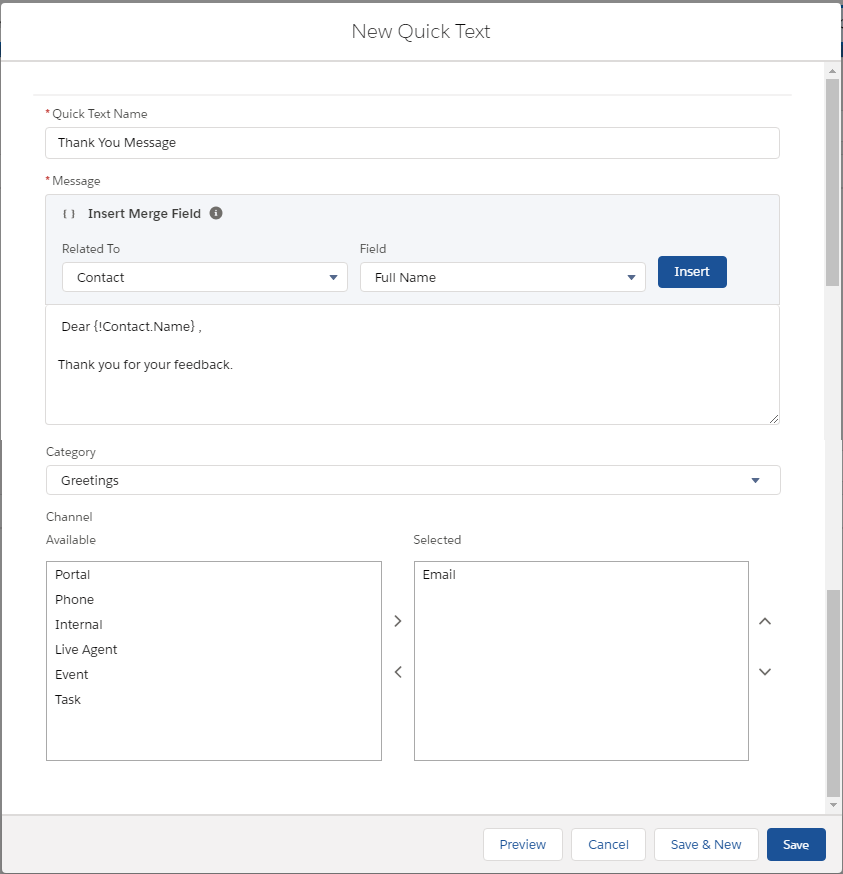
Create custom predefined messages to insert into emails, chats, tasks, events, and more. Quick text can include merge fields, line breaks, and special characters.

  • Open Quick Text tab
  • Click on New to create Quick Text (You can create record type for Quick Text)
  • Enter a message name (Use a name that helps users identify when to use this message)
  • Enter the message (The message can include line breaks, lists, special characters, merge fields, and up to 4,000 characters)
  • You can merge fields based on your requirement.
  • Select the channels in which you want the message to be available.
    • Email : For Email actions
    • Event : For Event actions
    • Internal : Works with internal fields, like on the Change Status action
    • Knowledge : For Knowledge articles in Lightning Experience
    • Live Agent : Works with Live Agent chat in the Service Console
    • Phone : or the Log a Call action
    • Portal : Works in a community or a customer portal
    • Social : For social posts
    • Task : For Task actions
  • Select a category
  • Select a channel
  • If you use merge fields, click Preview to review the message with data from records that you choose.
  • Save

Insert and Use Quick Text:
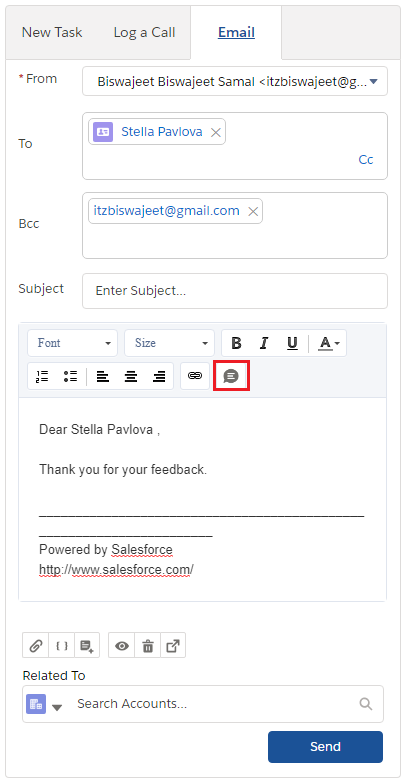
You can use quick text on all standard and custom objects in the following supported quick actions or places: emails, events, Knowledge articles, Live Agent chats, Log a Call actions, social posts, and tasks.

Share Quick Text:
You can share quick text with users, public groups, and more. The way you share quick text in Salesforce Classic and Lightning Experience is different. In Salesforce Classic, you can share individual quick text. In Lightning Experience, you share quick text using folders.

You can also change your org-wide default sharing setting for quick text. Or you can limit access by creating sharing rules to specify which groups of users have access to quick text.

Fire Events From Lightning Component and Handle in VisualForce Page

Lightning Event:

<!--SampleEvent.evt--> 
<aura:event type="APPLICATION" description="Sample Event">
    <aura:attribute type="string" name="msg" />
</aura:event>

Lightning Component:

<!--SampleComponent.cmp--> 
<aura:component implements="flexipage:availableForAllPageTypes,force:appHostable" access="global">
    <!--Declare Aura Event-->
    <aura:registerEvent name="sampleEvent" type="c:SampleEvent" />
    
    <!--Component Start--> 
    <div class="slds-m-around_xx-large">
        <lightning:button variant="Brand" class="slds-button" label="Submit" onclick="{!c.doAction}"/>
    </div>
    <!--Component End-->
</aura:component>

Lightning Controller:

({
    doAction : function(component, event, helper) {
        //Get Event
        var sampleEvent = $A.get("e.c:sampleEvent");
        //Set Parameter Value
        sampleEvent.setParams({"msg":"Hello World!!"});
        //Fire Event
        sampleEvent.fire();
    }
})

Lightning App:

<!--SampleApp.app--> 
<aura:application extends="ltng:outApp" access="global">
    <!--Lightning component-->
    <aura:dependency resource="c:SampleComponent"/>
</aura:application>

Visualforce Page:

<apex:page sidebar="false" showHeader="false">
    <apex:includeLightning />
    <!--Lightning Container-->
    <div style="width:100%;height:100px;" id="LightningContainer" />
    
    <script type="text/javascript">
    //Create Lightning Component
    $Lightning.use("c:SampleApp", function() {
        $Lightning.createComponent("c:SampleComponent", { },"LightningContainer",
                                   function(component) {
                                       $A.eventService.addHandler({ "event": "c:SampleEvent", "handler" : getMessage});
                                   });
    });
    
    //Function to call Lightning Component Function
    var getMessage  = function(event){
        var msg = event.getParam("msg");
        alert(msg);
    };
    </script>
</apex:page>

Output:

Apex Callable Interface

In Winter’19 release Salesforce introduced Callable interface in apex. The interface enables developers to use a common interface to build loosely coupled integrations between Apex classes or triggers, even for code in separate packages.

This interface has one method call(String action, Map args). It helps developer to call a method dynamically with the help of “Type” class.

Example:

public class SampleCallable implements Callable {
    
    //Method 1
    public String method1(String stringValue) {
        return 'Welcome ' + stringValue;
    }
    
    //Method 2
    public Decimal method2(Integer integerValue) {
        return integerValue + 100;
    }
    
    //Callable interface method
    public Object call(String action, Map<String, Object> args) {
        switch on action {
            when 'method1' {
                return this.method1((String)args.get('stringValue'));
            }
            when 'method2' {
                return this.method2((Integer)args.get('integerValue'));
            }
            when else {
                return null;
            }
        }
    }
}

Execute:

Callable c = (Callable)Type.forName('SampleCallable').newInstance();
system.debug(c.call('method1', new map<String,Object>{'stringValue' => 'Biswajeet'}));
system.debug(c.call('method2', new map<String,Object>{'integerValue' => 5}));