Salesforce Spring ’20 Release Summary
Salesforce Spring ’20 Release Dates
For the Spring ‘20 Release, the preview instances will be upgraded to Spring ‘20 on January 3 and January 4, 2020, and non-preview instances will be upgraded to Spring ‘20 on February 14 and February 15, 2020.
Create a Filtered List of Records Using New Time-Related Conditions (Beta)
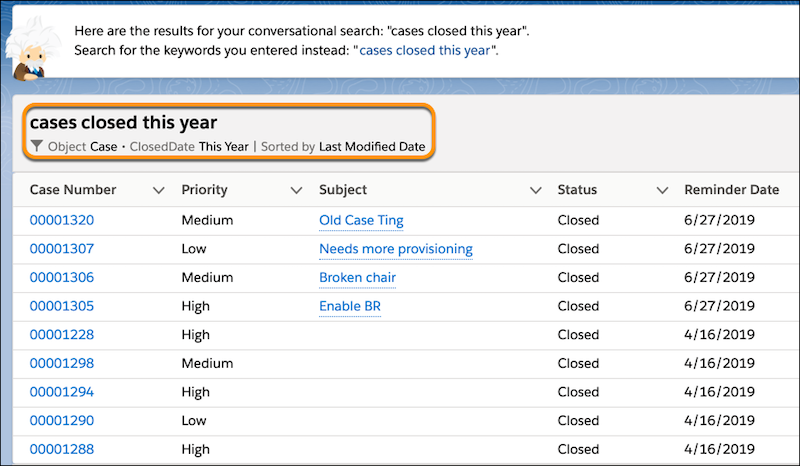
You now have more ways to filter a list of records using time-related conditions in a conversational search. To get the most relevant search results, enter a conversational search using the words modified, created, viewed, or closed followed by a relative time period. For example, enter “cases closed this year,” to see a list of cases from the current year with closed status.
Where: This change applies to Lightning Experience in Unlimited, Enterprise, and Performance editions.
Who: Conversational search results require the Einstein Search permission set license.
Empty the Recycle Bin in One Step
Empty your Salesforce org’s Recycle Bin in Lightning Experience with a single click. Previously, you either selected individual items to delete, or had to switch to Salesforce Classic to permanently delete all items at once.
Where: This change applies to Lightning Experience in Group, Essentials, Professional, Enterprise, Performance, Unlimited, and Developer editions.
Who: To empty the org Recycle Bin, you need the Modify All Data permission.
How: Open the org Recycle Bin and click Empty Org Recycle Bin.

Access Reports and Dashboards in the Recycle Bin
Manage your deleted reports and dashboards in the Recycle Bin for Lightning Experience. Now you can view, restore, and permanently delete your reports and dashboards without switching to Salesforce Classic.
Where: This change applies to Lightning Experience in Group, Essentials, Professional, Enterprise, Performance, Unlimited, and Developer editions.
Manage All Lightning Experience Configuration Converter Tabs from One Place (Beta)
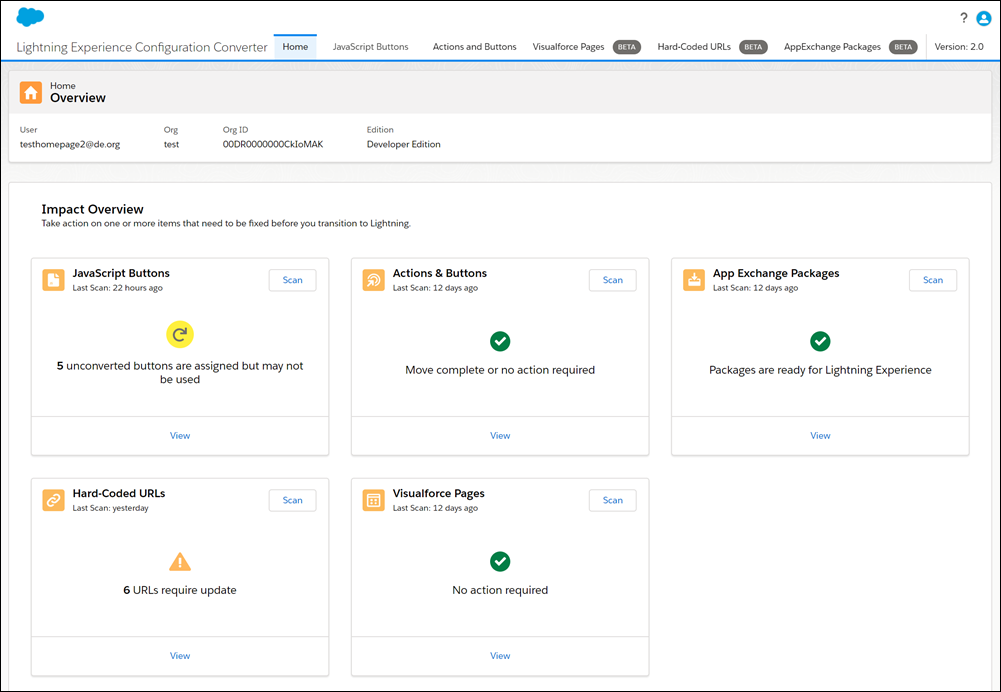
The new Home tab is your home base for the transition tool. Tiles summarize the status of each tab in the Lightning Experience Configuration Converter. Kick off scans of individual tabs, and find out what’s left to do.
Where: This change applies to Lightning Experience and Salesforce Classic in Enterprise, Professional, Performance, Unlimited, and Developer editions.
Who: The Lightning Experience Configuration Converter feature requires the Customize Application and Modify All Data permissions.
Why: Easily track your progress as you reduce the number of necessary fixes and change each tab’s status icon to green.
How: The Lightning Experience Configuration Converter is a standalone tool that lives outside of Salesforce. Salesforce recommend that you run it in a sandbox or Developer Edition org first, and then migrate your changes to your production org. To get started, visit https://lightning-configuration.salesforce.com/ and log in with your org credentials.
Attach Formatted Spreadsheets to Report Subscriptions (Beta)
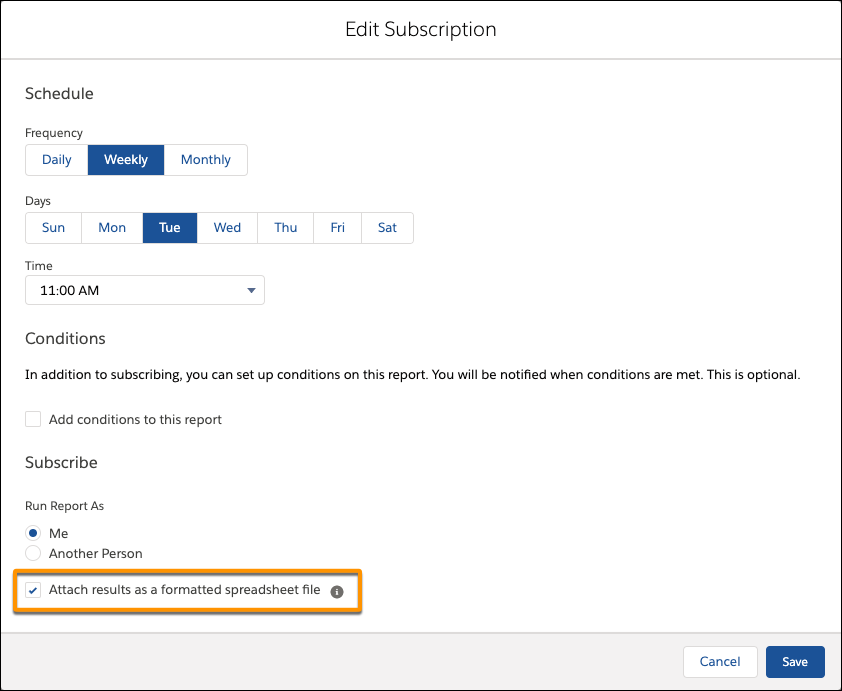
When people subscribe to a report, a new option lets them choose to receive results as a formatted spreadsheet attached to the subscription email. The email itself includes high-level report details, such as report name and time run, plus a link back to the full report in Salesforce. It does not include row-level record details, which are included in the spreadsheet instead.
Where: This change applies to Lightning Experience in Group, Essentials, Professional, Enterprise, Performance, Unlimited, and Developer editions.
How: Subscribe to a report, select Attach results as a formatted spreadsheet file, and click Save.
Increase Productivity with Local Development for Lightning Web Components (Beta)
Lightning Web Components now offers local development so that you can build component modules and view your changes live without publishing your components to an org. Our new Salesforce CLI plugin lwc-dev-server configures and runs a Lightning Web Components-enabled server on your computer.
Where: This change applies to Lightning Experience and all versions of the Salesforce app in Enterprise, Performance, Unlimited, and Developer editions.
How: To install the local development server click here.
Schedule an Appointment That Immediately Follows Another (Beta)
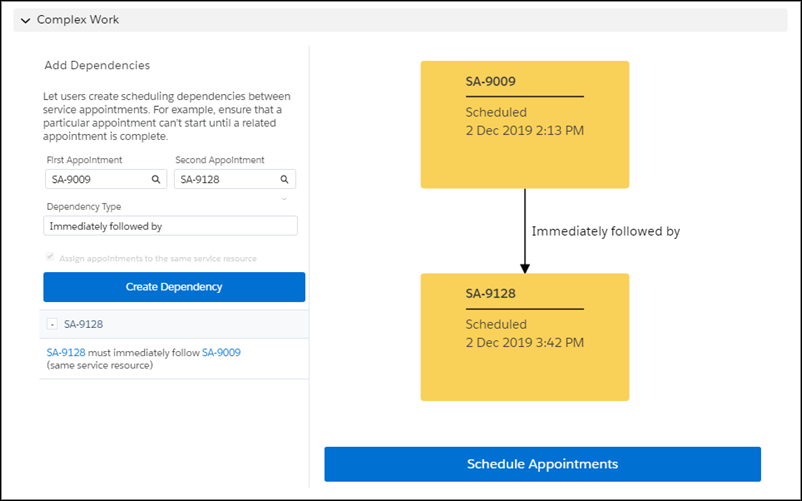
When you want service appointments to occur back-to-back, create an Immediately Followed By dependency between them.
Where: This feature applies to Lightning Experience and Salesforce Classic in Enterprise, Performance, Unlimited, and Developer editions with the Field Service Lightning managed package installed.
Why: This type of dependency prevents a resource from being scheduled between two appointments. For example, when an auto repair shop schedules a tow truck resource, the first appointment is the pick-up of a broken-down car. The next appointment must be the drop-off at the garage.
How: Enable the complex work setting, and customize the service appointment page layout to show scheduling dependencies. Then, on an appointment page, specify related appointments and select the dependency type. For Immediately Followed By dependencies, scheduling assigns the appointments back-to-back on the same day and to the same resource. Enhanced Optimization respects Immediately Followed By dependencies.
Help Your Chat Agents Respond Faster with Einstein Reply Recommendations (Pilot)
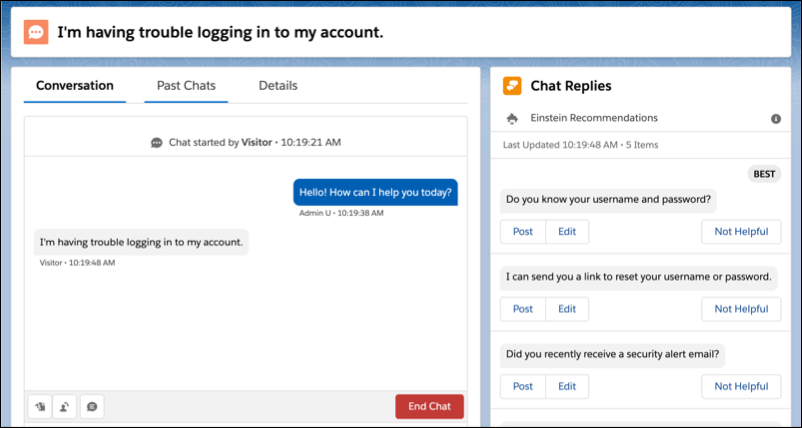
Einstein Reply Recommendations analyzes data from chat transcripts to create chat replies that address your customers’ inquiries. Agents select the most relevant chat reply from a list in the Lightning Service Console as they communicate with customers.
Where: This change applies to Lightning Experience in Enterprise, Performance, Unlimited, and Developer editions.
Why: When you set up Einstein Reply Recommendations, Einstein examines closed chat transcripts to produce a list of suggested replies that agents can use while they chat with customers.
After Einstein creates suggested replies, approve or change them to meet your business’s needs. After an admin approves the replies, the replies appear in the Einstein Suggestions Card in the Lightning Service Console. As agents chat with customers, Einstein analyzes the chat and dynamically surfaces the most relevant replies. Agents can select and send the suggested replies that best resolve their customers’ issues.
New Lightning Experience Features with the Lightning Extension for Chrome (Generally Available)
Are you an early adopter of the latest and greatest technology, or do you want to become one? With the Lightning Extension, now generally available, you can gain access to the latest Lightning Experience features and try them before everyone else.
Where: This change applies to Lightning Experience in all editions.
Why: The Lightning Extension lets us roll out new features continuously. Admins can control which features are available to their users.
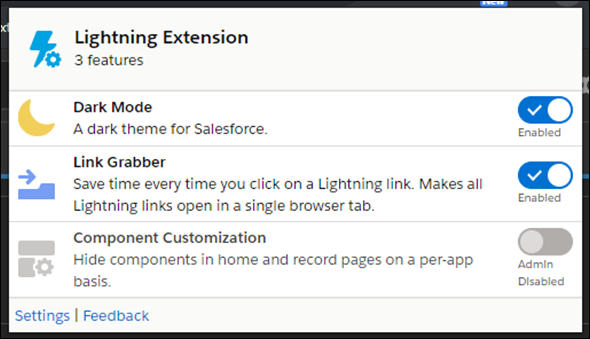
How: Download the Lightning Extension for your browser. From the Lightning Extension features panel, choose which features to turn on.
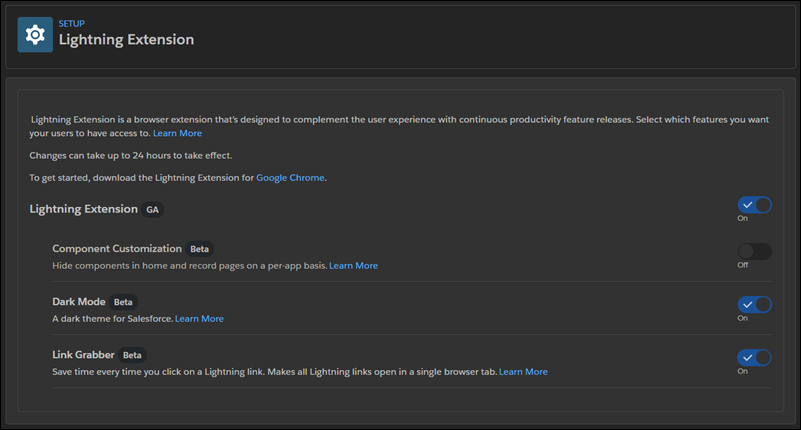
To control which features are available to your users, from Setup, in the Quick Find box, enter Lightning Extension, and then select Lightning Extension. From there, you can activate individual features or disable the extension as a whole. Changes can take up to 24 hours to take effect.
Clone Objects Along with Their Related Records
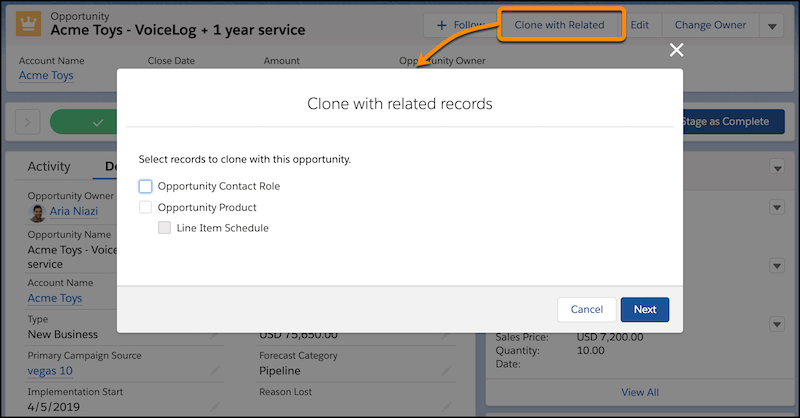
The Clone with Related action makes it simple to handle a variety of repeating business processes. When you click Clone with Related, all of the original object’s related records are also added to the cloned object.
Where: This change applies to Lightning Experience in Professional, Enterprise, Performance, Unlimited, and Developer editions.
Who: To use the Clone with Related action, users must have Create permission on the object and Read access to the record they want to clone.
Why: Users can easily include related records when they clone a record.
How: In the Object Manager, find one of the supported objects and select Page Layout. Add the Clone with Related action to the layout, and save. In the dialog, the order of the options can’t be changed.
Assign Tasks to a Queue
Let sales reps share their workload by setting up queues for tasks. Reps can assign tasks to their shared queues, and then individuals can take ownership of those tasks from the queue’s list view.
Where: This change applies to Lightning Experience in Essentials, Professional, Enterprise, Performance, Unlimited, and Developer editions.
Why: When reps assign tasks to a queue, those tasks are available to members of the queue, which means everyone can pitch in to help. No more relying on one sales rep to do it all. Now others on the team can lend a hand without waiting for work to be delegated or reassigned.
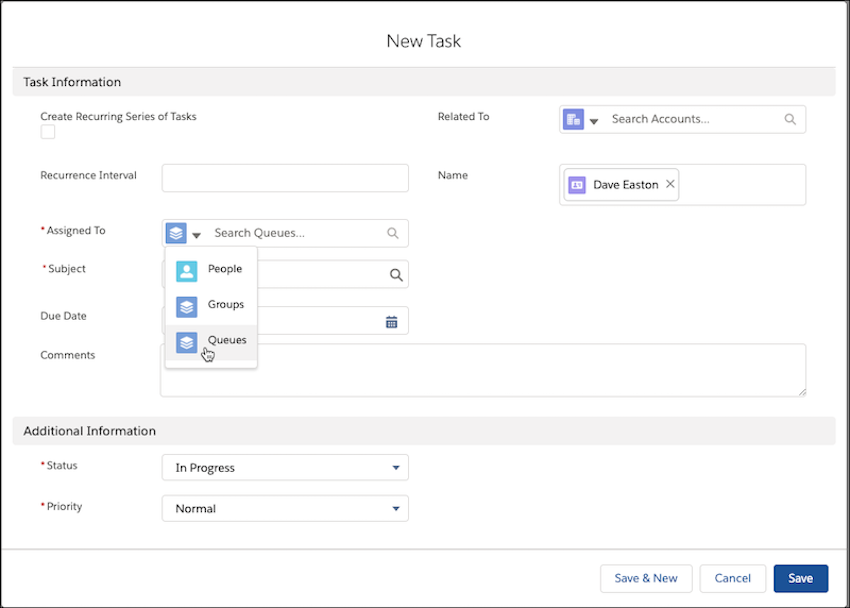
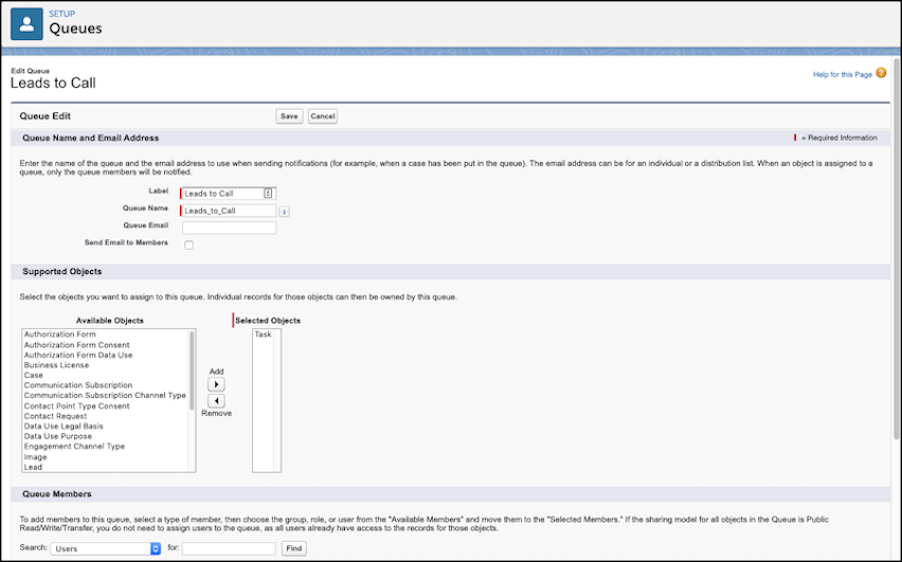
How: In Setup, enter Queues in the Quick Find box and then select Queues. From the Queues setup page, select New. Then, create a queue and assign Task as the supported object.
View and Edit Case Details from the List View with Case Hover in Lightning Experience
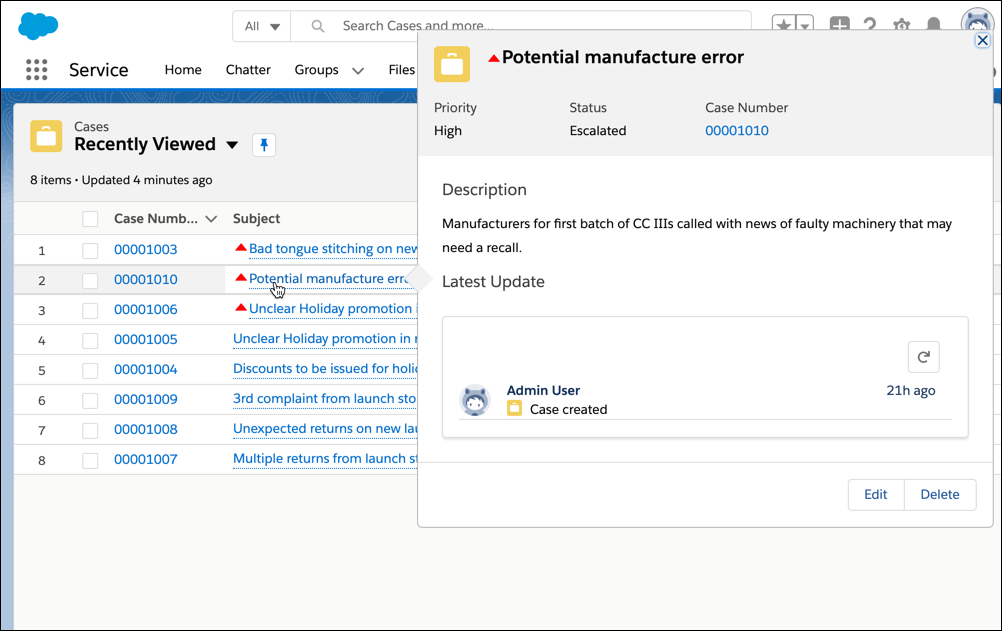
Agents can save time by previewing, editing, and deleting cases directly from the list view with a compact preview that appears when they hover on the case subject.
Where: This change applies to Lightning Experience in Essentials, Professional, Performance, Unlimited, Enterprise, and Developer editions.
How: Hover over the Subject line to see a preview of the case and to quickly edit or delete the case. You can customize which fields show in the modal by changing the compact layout in Service Settings.
Update New and Changed Records 10 Times Faster by Using Before-Save Updates in Flows
Creating or updating a record can now trigger an autolaunched flow to make additional updates to that record before it’s saved to the database. Before-save updates in flows are much faster than other available record-triggered updates. For example, a before-save update in a flow is 10 times faster than an update in a record-change process that’s built in Process Builder. Replace your record-change processes with flows to minimize how often the spinner appears when users save records.
Where: This change applies to Lightning Experience and Salesforce Classic in Essentials, Professional, Enterprise, Performance, Unlimited, and Developer editions.
Who: To activate a flow that makes before-save updates, you need the View All Data permission.
Why: Perhaps you’re familiar with Process Builder and using a record-change process to make additional updates to each record that triggers the process. Such a process can set the Region custom field automatically on each new case record. Before-save updates in flows accomplish that same goal, but much more quickly because each record doesn’t get saved to the database again. Avoiding that extra save procedure means skipping another round of assignment rules, auto-response rules, workflow rules, and other customization that take time to execute.
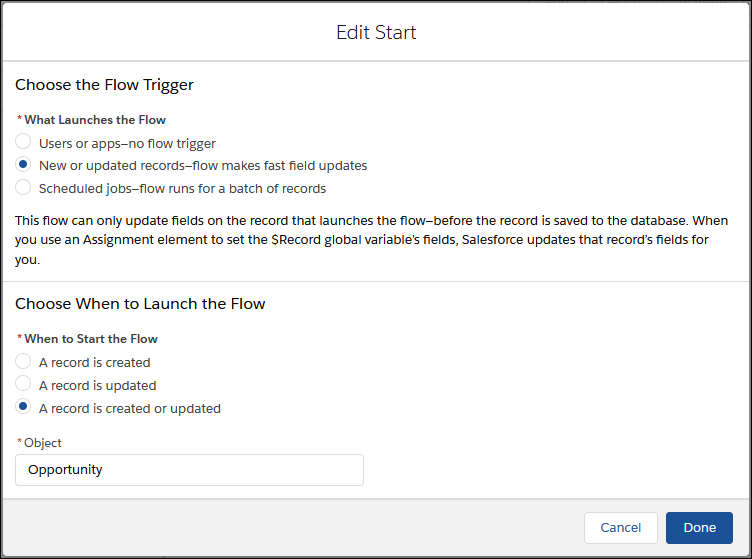
How: Create an autolaunched flow and open the Start element. For What Launches the Flow, select New or updated records—flow makes fast field updates.
For a flow that makes before-save updates, the Flow Builder toolbox offers only four elements: Assignment, Decision, Get Records, and Loop.
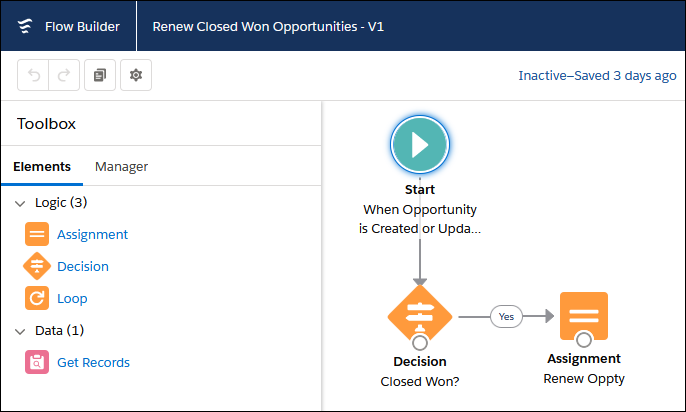
In the flow, the $Record global variable contains the record values. Use an Assignment element to update those values, and let Salesforce handle the rest. You don’t even have to create any variables or add an Update Records element to your flow.
See the Related Account When You Search for Contacts or Opportunities
Looking for a contact or opportunity but not sure which account it belongs to? Now when your sales team searches, they see the related account in instant results and recent items. And best of all, the related account is searchable, so it’s easier to find the right record fast.
Where: This change applies to Lightning Experience, and all editions except Database.com.
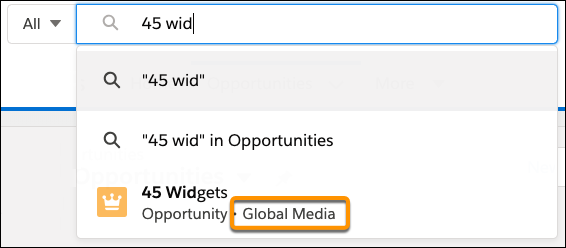
Why: Typically, an object’s search results layout determines which fields appear as the secondary field. For contacts and opportunities, the related account is always the secondary field because it’s a key piece of information.
When you start typing, any matching results show the related account.
Let Guest Users Schedule Inbound Appointments
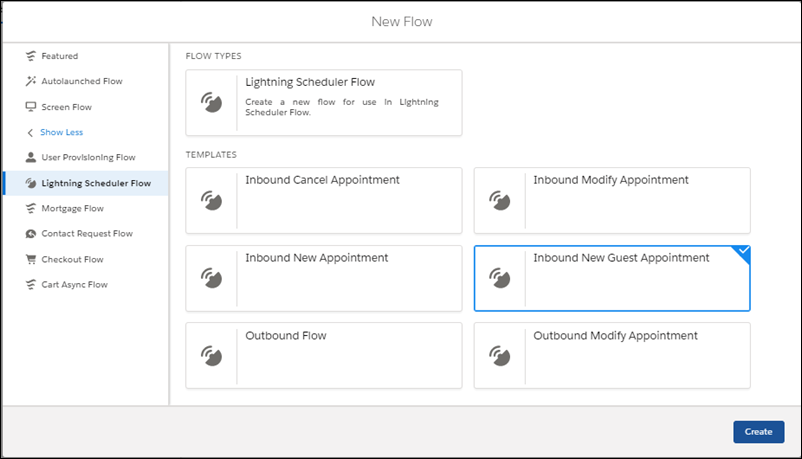
Unauthenticated guest users can use Lightning Scheduler’s self-service interface to schedule appointments. Lightning Scheduler now includes guest user security enhancements to Lightning Scheduler objects and the Inbound New Guest Appointment standard flow template. The enhancements for guest users also include a new Enable Guest User attribute on the Review Service Appointment flow screen component.
Where: This change applies to Lightning Experience in Enterprise, Performance, and Unlimited editions with Lightning Scheduler enabled.
How: To get started, you can clone and modify the new Inbound New Guest Appointment standard flow template, or create your own flows in Flow Builder.
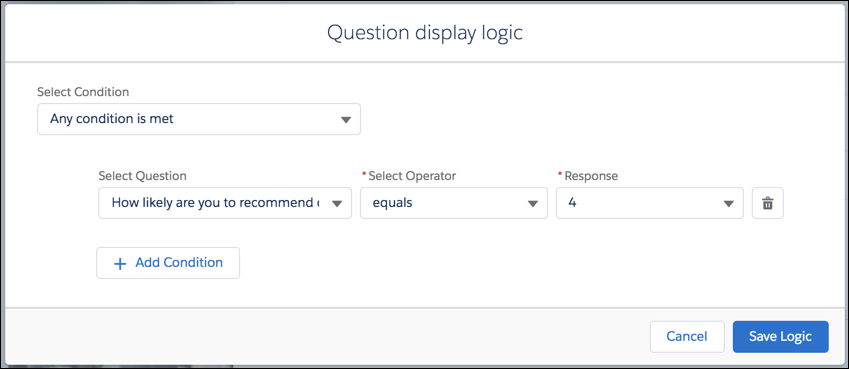
Display Questions Based on Participant Responses
Choose which questions your participants view on a page. Based on how participants respond to the previous questions on a page, decide which questions they view next.
Where: This change applies to Lightning Experience in Performance, Partner Developer, Enterprise, Developer, and Unlimited editions where Salesforce Surveys is enabled.
How: On the question that you want to display based on the response to a previous question, click Display Logic. In the Question display logic modal, define the conditions based on which the question is displayed.
Compare Versions of an Article to See What Changed (Beta)
Knowledge users can compare two versions of an article to review changes. The Article Version Comparison app component lets authors choose a version to see the differences.
Where: This change applies to all editions of Knowledge in Lightning Experience.
Why: Your authors and editors can more easily review changes and track progress across versions with the Article Version Comparison component. Your users choose a version to compare against the currently viewed version.
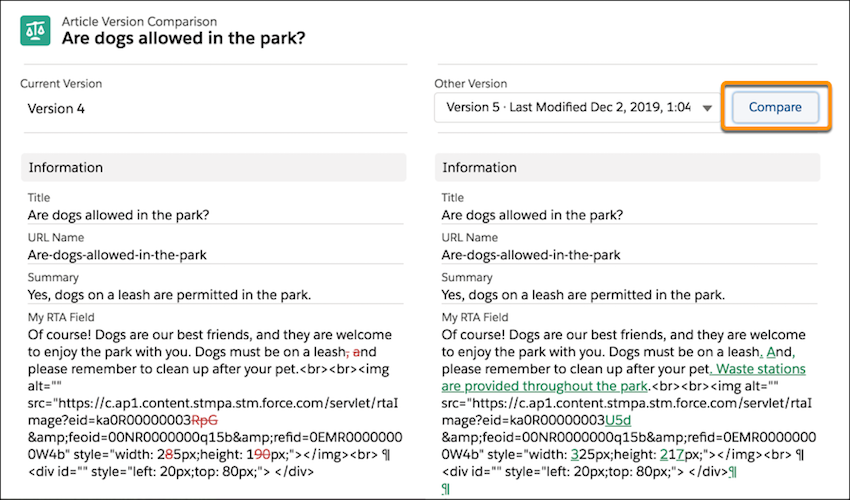
How: In the Lightning Page builder, drag the Article Version Comparison component onto your Knowledge layout. Salesforce recommend creating a tab in your layout for this tool so it’s available for your team when they need it. Comparing articles isn’t supported in Microsoft IE11 or the Microsoft Edge browser.
Specify Profiles When Creating Prompts
Fine-tune your prompt’s message for a specific audience, what objects and data they have access to, or what they can do. Previously, you could only use permissions to display prompts to specific users. Starting in Spring ’20, use standard and custom profiles too.
Where: This change applies to Lightning Experience in Essentials, Group, Professional, Enterprise, Performance, Unlimited, and Developer editions.
How: From Setup in Lightning Experience, enter In-App Guidance in the Quick Find box, and then select In-App Guidance.
If you select multiple profiles, the prompt appears to any of the profiles specified. You can select a combination of up to 10 profiles and permissions for each prompt. If you select multiple items, the prompt appears to users who have all the permissions specified and any of the profiles specified.
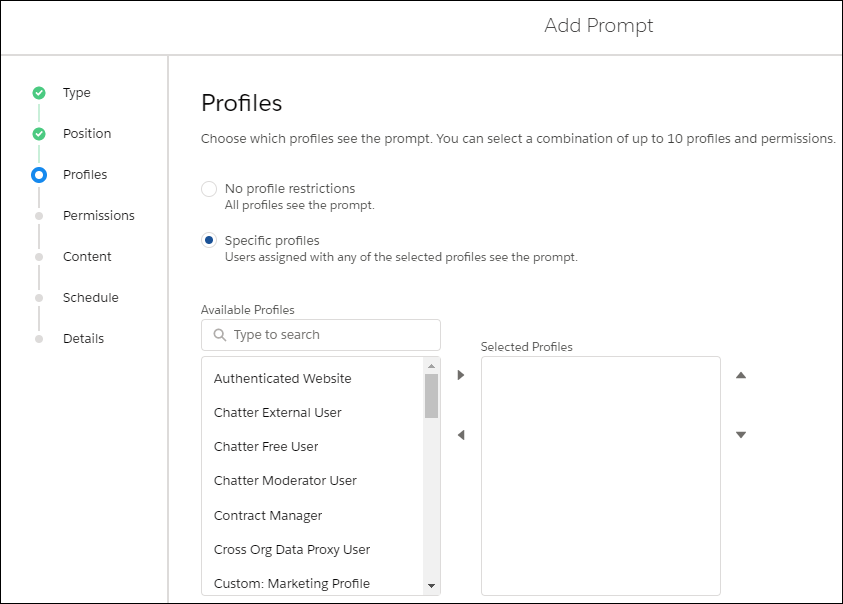
In addition, users no longer need the View Set up and Configuration permission to see prompts that are only visible with specific permissions.
Customize When Prompts Appear to Users
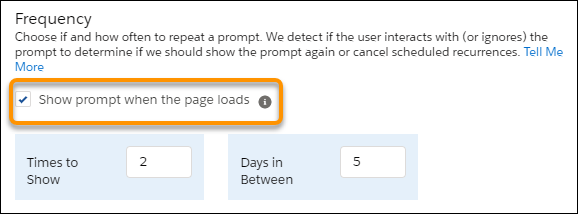
Quickly change the amount of time to delay prompts. Decrease the global delay time to accelerate onboarding prompts or increase the delay to spread out announcements and updates. Ignore the global delay time to show a prompt when a page first loads or to show multiple prompts a day without changing the global delay time for all prompts.
Where: This change applies to Lightning Experience in Essentials, Group, Professional, Enterprise, Performance, Unlimited, and Developer editions.
How: From Setup in Lightning Experience, enter In-App Guidance in the Quick Find box, and then select In-App Guidance.
Click Prompt Settings and change the hours and minutes under Delay Between Prompts. Specify up to 99 hours and up to 59 minutes. By default, a prompt appears to a user no more than once every 24 hours, per app.
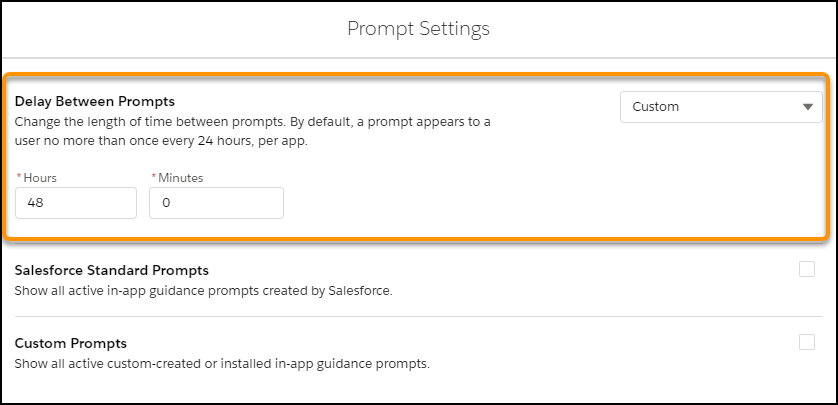
To ignore the global delay time, check Show prompt when the page loads on the Schedule page when creating a prompt.
Schedule and Manage Scheduled Emails in Lightning Experience
Sales reps can specify email arrival times to increase the chances of an email being read. They can schedule an email to arrive at the start of a contact’s work day, for example. The new Scheduled Emails component lets reps update content of a scheduled email, and change its scheduled date and time.
Where: This change applies to Lightning Experience in Enterprise, Performance, and Unlimited editions.
Who: Users with the Use Inbox user permission, available with the High Velocity Sales or Inbox license.
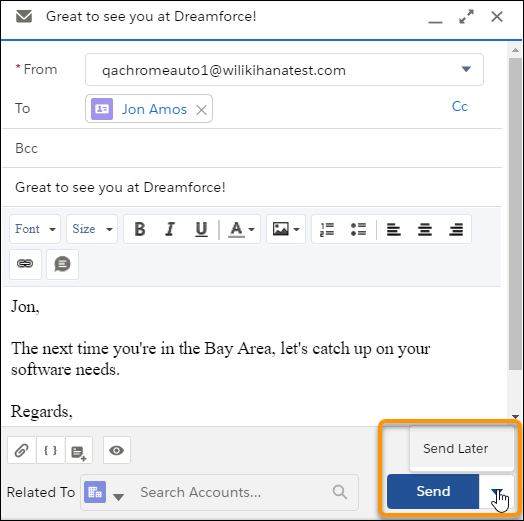
How: To schedule an email, sales reps select Send Later in the email composer.
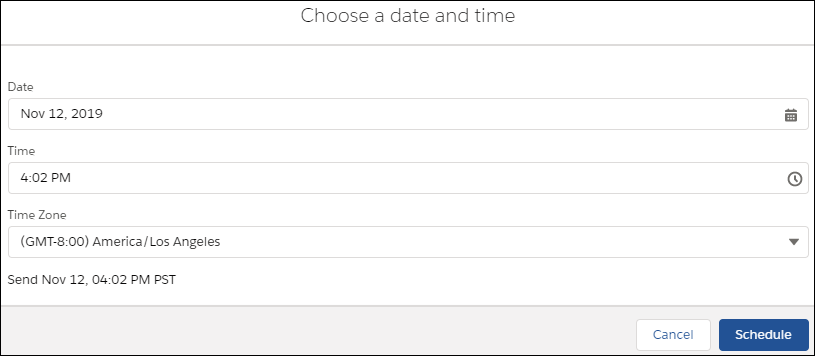
The rep then selects the date and time and clicks Schedule.
To let your reps manage scheduled emails, use Edit Page to add the Send Email Later – Pending List component to any object’s home page, including the Salesforce homepage.
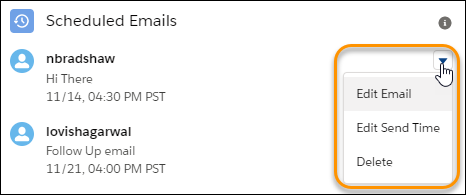
Using that component, reps can reschedule, edit, or delete an already-scheduled email.
Count Unique Values in Report Results (Beta)
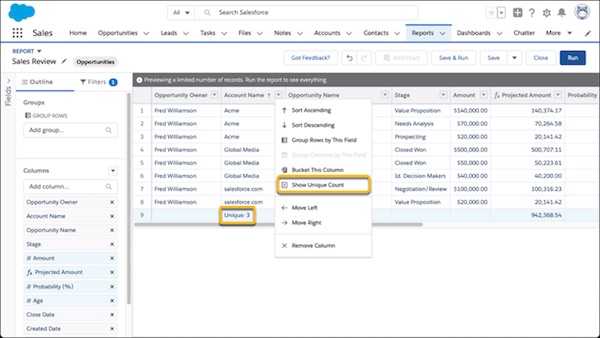
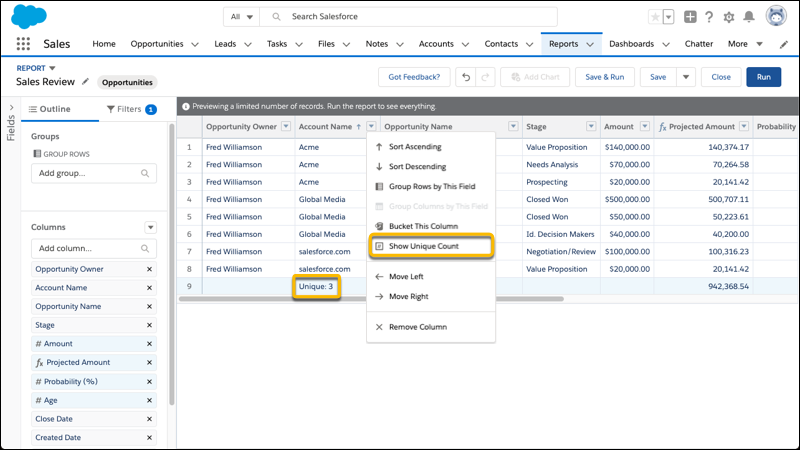
See how many distinct values your report returns with a unique count. For example, opportunity reports often list multiple opportunities with the same account. Add a unique count to the Account Name column to see how many individual account values appear in the report. Unique counts appear as grand totals at the bottom of the report and as subtotals for each group.
Where: This change applies to Lightning Experience in Group, Essentials, Professional, Enterprise, Performance, Unlimited, and Developer editions.
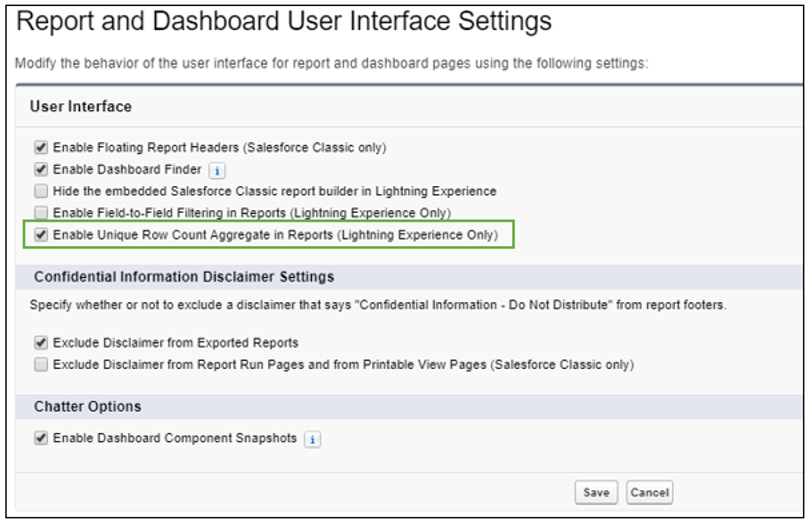
How: In Setup, in Reports and Dashboards Settings, select Enable Unique Row Count Aggregate in Reports (Lightning Experience Only) and click Save. To add a unique count of values for a field, in the column, click More Actions Arrow | Show Unique Count.
Filter Reports by Field Comparisons with Field-To-Field Filters (Generally Available)
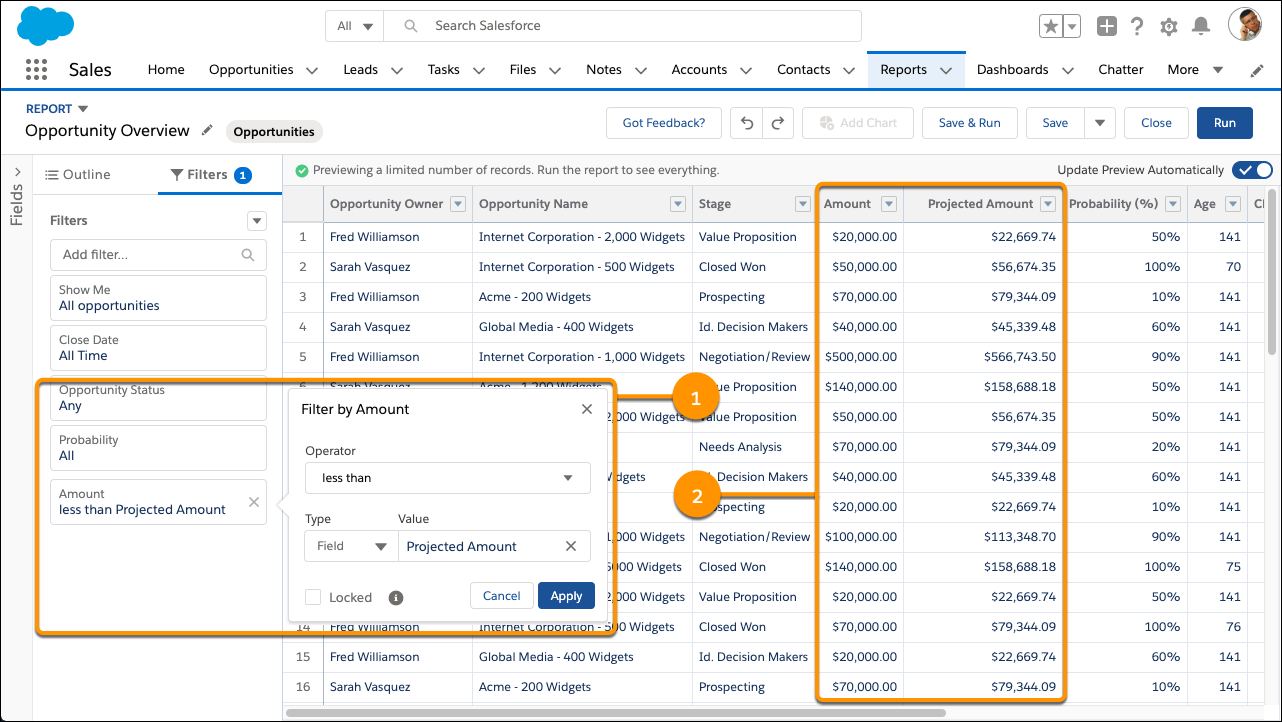
Compare the values of two different report fields and return records that satisfy the comparison criteria with a field-to-field filter. For example, return opportunities worth less than projected by comparing the Amount and Projected Amount fields, only returning opportunities which have a lesser Amount.
Where: This change applies to Lightning Experience in Group, Essentials, Professional, Enterprise, Performance, Unlimited, and Developer editions.
How: Add a field filter, and change Value to Field in the filter dialog. In this example, a field-to-field filter (1) returns opportunities worth less than projected (2).
Now that field-to-field filters are generally available, they can be deployed from one Salesforce org to another as part of a managed or unmanaged package.
Add Videos to Docked Prompts
The video previews inside the docked prompt.
Where: This change applies to Lightning Experience in Essentials, Group, Professional, Enterprise, Performance, Unlimited, and Developer editions.
How: From Setup in Lightning Experience, enter In-App Guidance in the Quick Find box, and then select In-App Guidance.
When adding a video to a docked prompt, enter the URL specified in the src attribute listed in the embed code from the video host.

Users watch the video within the docked prompt, in the expanded docked prompt, or full screen.
Send Emails Automatically from Sales Cadences
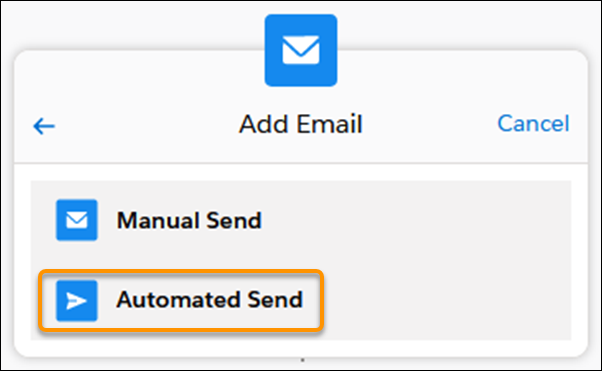
Save sales reps time with automated template-based emails. Sales managers can now add email steps that send automatically when the step comes due.
Where: This change applies to High Velocity Sales in Lightning Experience. High Velocity Sales is available as an add-on in Enterprise, Performance, and Unlimited editions.
How: In the Sales Cadence Builder, add an email step, and choose to send the email automatically using a template.
Use Filters to Narrow Opportunity Product Searches in Lightning Experience
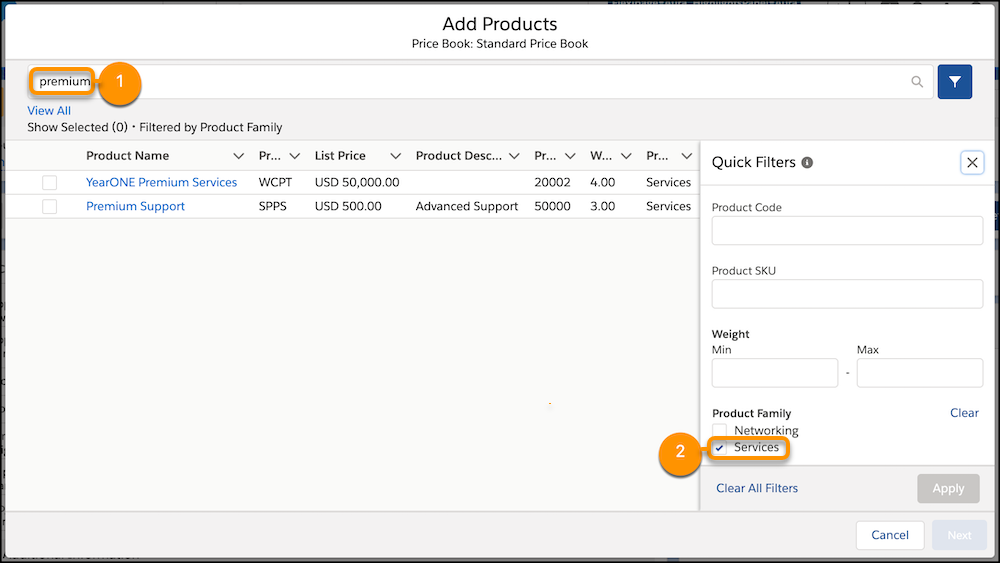
Sales reps can now use filters to home in on the exact products they want to add to opportunities in Lightning Experience. No more scrolling through a long list of products to add line items to an opportunity.
Where: This change applies to Lightning Experience in Professional, Enterprise, Performance, Unlimited, and Developer editions.
Why: If your product catalog lists many items, your reps can now filter searches by product fields to narrow their search results. For example, on this opportunity, the results of a search for “premium” (1) are filtered to show results in only one product family (2).
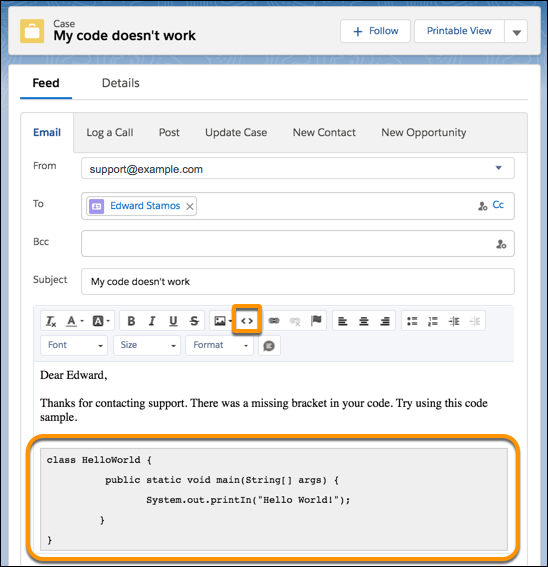
Insert Code Samples into Case Feed Emails
email composer and in the email message.
Where: Available in the Essentials, Enterprise, Performance, Unlimited, and Developer Editions in Lightning Experience.
How: Open a case, and then click Email or open the email publisher. Click the code sample icon. In the code sample window, either enter the code or copy and paste it, and click Insert Code.
Use a Permission Set to Assign the Delegated External User Administrator Permission
Instead of creating a user profile just for delegated external admins, use your regular profiles and assign the Delegated External User Administrator (DEUA) permission using a permission set. Configure the list of profiles and permission sets an external user with the DEUA permission can manage on that external user profile.
Where: This change applies to all communities accessed through Lightning Experience and Salesforce Classic in Enterprise, Essentials, Performance, Unlimited, and Developer editions.
Use Advanced Currency Management in Lightning Experience
You can manage dated exchange rates within opportunities without switching to Salesforce Classic. Advanced currency management is now available in Lightning Experience.
Where: This change applies to Lightning Experience in Group, Professional, Enterprise, Performance, Unlimited, and Developer Editions.
Let Users Log In to Salesforce with Their Apple ID
Using the new Apple authentication provider, your customers can log in to a Salesforce org or community with their Apple ID.
Where: This change applies to Lightning Experience and Salesforce Classic in Enterprise, Performance, Unlimited, and Developer editions.
How: To let users log in with their Apple ID, create an Apple authentication provider from the Salesforce Auth. Providers Setup page. After configuring the authentication provider and adding the Apple sign-in button to your Salesforce and Communities login pages, users can log in with their Apple credentials.
Add More Components to a Lightning Page Region
Salesforce increased the number of components that you can put into a Lightning page region from 25 to 100. This increase also applies to the number of tabs that you can add to a Tabs component and the number of sections in an Accordion component.
Where: This change applies to Lightning Experience in Group, Essentials, Professional, Enterprise, Performance, Unlimited, and Developer editions.
Protect Custom Settings in Developer and Scratch Orgs
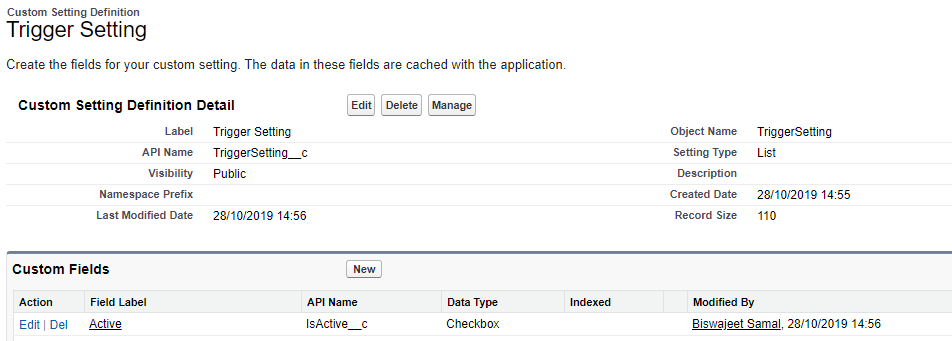
The Visibility field is now only available in developer or scratch orgs, where managed packages can be created. When you create a custom setting, the package type and the Visibility field determine whether the custom setting is public or private. You can only create protected custom settings in a developer or scratch org that are then deployed in a managed package. In addition, the Visibility field must be set to protected.
Where: This change applies to Lightning Experience and Salesforce Classic in Contact Manager, Essentials, Professional, Enterprise, Performance, Unlimited, and Developer editions.
How: When storing sensitive information, create protected custom settings in a developer or scratch org, set the Visibility field to protect, then deploy them in a managed package.
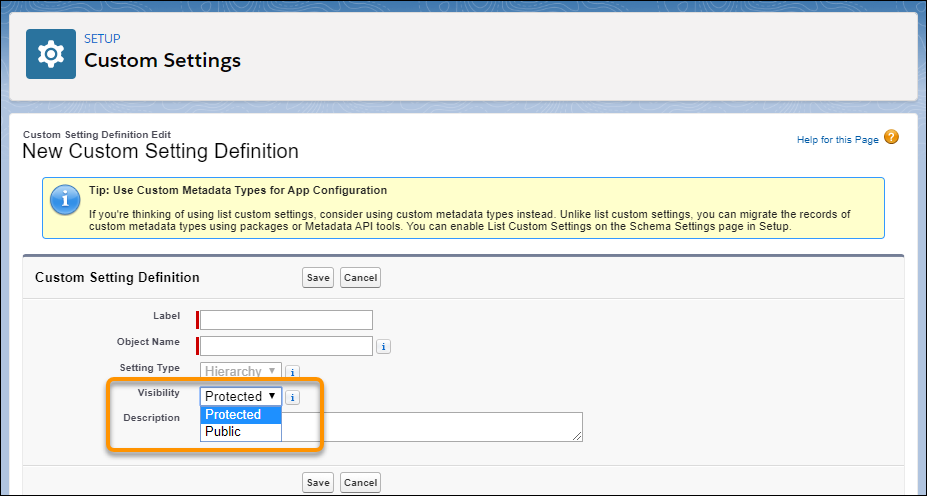
Custom settings that are set to Protected and deployed as a manage package are not accessible from subscribing organizations. However, the information is accessible from the Apex code that is part of the managed package.
Custom settings that are set to Public, or contained in an unmanaged package, are visible through Enterprise WSDL files. Subscribing organizations can access and edit the values using Apex and SOAP API.
Control Who Gets Read Access to Custom Settings
You can now control the access of custom settings at a granular level by granting direct Read access to specific custom settings through profiles and permission sets.
Where: This change applies to Lightning Experience and Salesforce Classic in Professional, Enterprise, Performance, and Unlimited editions.
When: This feature is a late-breaking addition to the Winter ’20 release.
Who: Users with the Customize Application permission can grant read access to specific custom settings through profiles and permission sets.
How: To grant a Profile or Permission Set read access to specific custom settings, enable the Restrict access to custom settings org permission. Then enable access to specific custom settings.
1. From Setup, search for Schema Settings and make sure that the Restrict access to custom settings org permission is enabled.

2. From the Setup up page for Profiles or Permission Sets, click Custom Setting Definitions
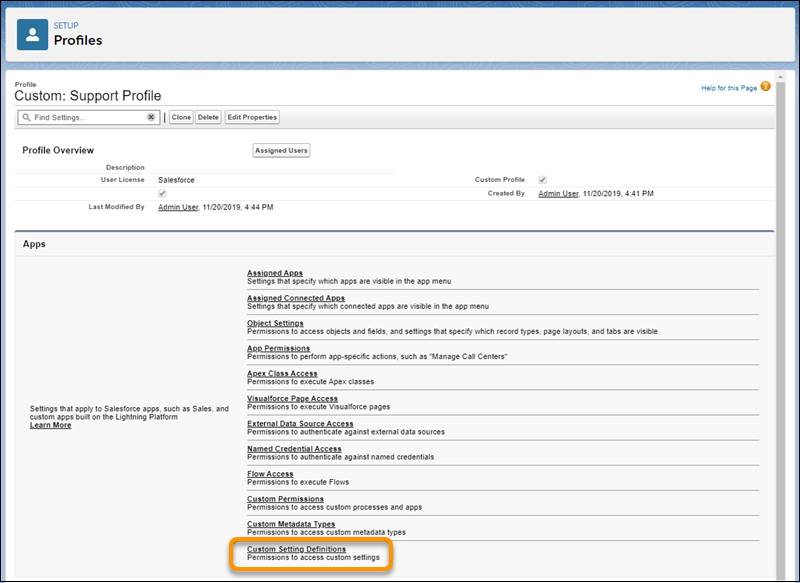
3. Add the custom setting to the Enabled Custom Setting Definitions list.
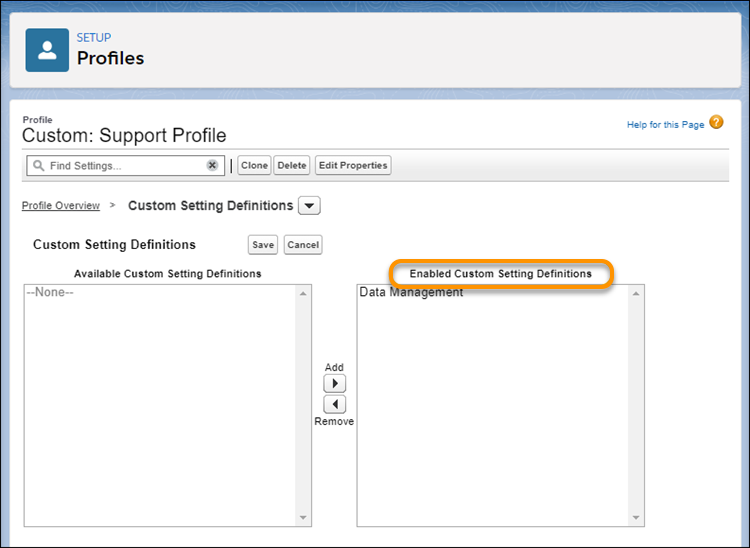
With Restrict access to custom settings enabled, permissions are enforced as follows.
1. Customize Application permission—Read and Write access to all custom settings.
2. Custom Setting Definitions—Read access to specific custom settings outside of System context. Users must be granted access through profiles and permission sets.
3. View All Custom Settings permission—Read access to all custom settings outside of System context.
4. View Setup and Configuration permission—Read access to custom settings in Setup. Users must be granted access to specific custom settings through profiles and permission sets, or be granted the View All Custom Settings permission.
Encrypt Platform Events
Encryption. In addition to Change Data Capture events, now you can encrypt all of your platform events including Real-Time Event Monitoring streamed events. When you enable Shield Platform Encryption for platform events, event messages are encrypted at rest in the event bus with a dedicated Event Bus key. Events stay encrypted for their duration in the event bus.
Where: This change applies to Lightning Experience in Enterprise, Performance, and Unlimited editions that have both Financial Services Cloud and Shield Platform Encryption enabled.
How: To enable encryption and delivery of platform events, first create an event bus tenant secret on the Key Management page in Setup. Then enable encryption of platform events on the Encryption Policy page.
Build Invocable Actions That Work for Multiple Objects
Now, developers can create reusable Apex actions that use the generic sObject and List
Where: This change applies to Lightning Experience and Salesforce Classic in Enterprise, Performance, Unlimited, and Developer editions.
How: Click here for more info.
New and Changed Components for Change Sets
Email Service – Represents an email service.
Lightning Community Template – Represents a template used to create and export customized communities and to distribute custom components for others to use,
Lightning Community Theme – Represents layouts and styles (colors, fonts, and images) to customize the appearance and structure of pages in a community. Community themes are pre-built (Customer Service, Partner Central, Customer Account Portal, and Build Your Own) or can be customized.
Lightning Message Channel – Represents a secure channel to communicate across UI technologies (Lightning Web Components, Aura Components, and Visualforce).
Managed Content Type – Represents the definition of custom content types for use with Salesforce CMS. Custom content types are displayed as forms with defined fields.
Whitelisted URL for Redirects – Represents a whitelisted URL that users can navigate to without being shown a warning message.
The @track Decorator Is No Longer Required for Lightning Web Components
No more guessing about whether to use @track to make a field reactive. All fields in a Lightning web component class are reactive. If a field’s value changes, and the field is used in a template or in a getter of a property that’s used in a template, the component rerenders and displays the new value.
Where: This change applies to Lightning web components in Lightning Experience and all versions of the Salesforce app.
Why: It was difficult for developers to know which fields to decorate with @track. When a field’s value changed, developers couldn’t easily predict when the component would rerender and display the new value.
How: The framework observes changes to a field’s value, rerenders the component, and displays the new value. All expressions in the component are also evaluated. In fact, since all fields are reactive, we no longer need to use the term “reactive field.”
Before Spring ’20, to make a field reactive, you had to decorate it with @track. You see this approach used in older code samples, and it’s still supported.
Enforce Field- and Object-Level Security in Apex (Generally Available)
The Security.stripInaccessible method for field- and object-level data protection is now generally available. Use the stripInaccessible method to strip fields that the current user can’t access from query and subquery results. Use the method to remove inaccessible fields from sObjects before a DML operation to avoid exceptions. Also, use the stripInaccessible method to sanitize sObjects that have been deserialized from an untrusted source.
Where: This change applies to Lightning Experience and Salesforce Classic in Enterprise, Performance, Unlimited, and Developer editions.
How: The stripInaccesible method checks the source records for fields that don’t meet the field- and object-level security check for the current user and creates a return list of sObjects. The return list is identical to the source records, except that fields inaccessible to the current user are removed.
Navigate to a Record’s Create Page with Default Field Values
se the new lightning/pageReferenceUtils module or lightning:pageReferenceUtils Aura component to build navigation links in your components that prepopulate a record’s create page with default field values. Prepopulated values can accelerate data entry, improve data consistency, and otherwise make the process of creating a record easier.
Where: This change applies to Lightning Experience in all editions. This change doesn’t apply to Lightning Out, Lightning communities, or the Salesforce mobile app.
How: This component provides utilities for encoding and decoding default field values. Pass this string into the new pageReference.state.defaultFieldValues attribute on standard__objectPage page reference types. Using this component alongside the existing lightning:navigation component, you can launch a record’s create page with prepopulated field values.
Salesforce recommend using lightning/pageReferenceUtils and lightning/navigation to navigate to a record’s create page instead of force:createRecord.
/lightning/o/Account/new?defaultFieldValues=
    Name={!URLENCODE(Account.Name)},
    OwnerId={!Account.OwnerId},
    AccountNumber={!Account.AccountNumber},
    NumberOfEmployees=35000,
    CustomCheckbox__c={!IF(Account.SomeCheckbox__c, true, false)}
Share Code Between Visualforce Pages in the Same Namespace with @namespaceAccessible
default, Lightning components and Visualforce pages installed in a second-generation packages can’t call a public Apex method in an Apex class in another package.
Where: This change applies to Lightning Experience and Salesforce Classic in all editions.
How: Include the @namespaceAccessible Apex annotation in your custom controller class so that Visualforce pages can access controllers that are in another package.
No Maximum Daily Capacity for API Calls
The maximum daily capacity of 1,000,000 API requests has been removed.
Where: This change applies to the Enterprise Edition and to the Professional Edition with API access enabled.
Why: This change allows you to make more API calls without exceeding your allocation.
Attach Actions to Asynchronous Apex Jobs Using Transaction Finalizers (Pilot)
With Spring ’20, Salesforce introduce a way to attach actions to queueable, asynchronous jobs using a new System.Finalizer interface. A specific use case is to design recovery action when a queueable job fails.
Where: This change applies to Lightning Experience and Salesforce Classic only in scratch orgs that have enabled the feature. Because finalizers are currently in pilot and are available only in scratch orgs, do not attempt to package finalizers.
Why: Currently, there is no direct way for you to specify actions to be taken when asynchronous jobs succeed or fail. You can only poll the status of asyncapexjob using a SOQL query, and re-enqueue the job if it fails. With transaction finalizers, you can attach a post-action sequence to an asynchronous job and take relevant actions based on the job execution result.
How: First, implement a class that implements the System.Finalizer interface. Then, attach a finalizer within a queueable job’s execute method by invoking the System.attachFinalizer method with an argument of the instantiated class that implements the finalizer interface. Only one finalizer can be attached to any queueable job. You can enqueue a single asynchronous Apex job (queueable, future, or batch) in your finalizer. You can also make callouts in the finalizer. Click here for an example.
Aura Components in the ui Namespace Are Deprecated
Salesforce plan to end support for the deprecated components on May 1, 2021.
Where: This change applies to orgs with Lightning components in Lightning Experience, Salesforce Classic, and all versions of the Salesforce app.
When: Salesforce plans to end support for Aura components in the ui namespace on May 1, 2021. You can continue to use these components beyond May 1, 2021, but we won’t accept support cases for them after that date.
Why: Retiring our legacy components enables us to focus on components that match the latest web standards in performance, accessibility, user experience, and internationalization.
How: Replace the deprecated components with their counterparts in the lightning namespace. These components are faster, more efficient, and they implement Lightning Design System styling out-of-the-box.
