Salesforce Two-Factor Authentication Using Login Flow
For higher security standards one of the best practices to implement is two-factor authentication. This is the method of adding a second factor to the username and password, where the password is the first factor. The second factor is usually done with a random and time-based one-time password (TOTP), generated on an approved mobile device or an approved email address.
When a user logs in, Salesforce considers the user’s geographic location and browser. If they’re not recognized, Salesforce prompts the user to verify their identity using the highest-priority verification method available for that user.
The following is the order of priority for verification methods.
- Verification code generated by a mobile authenticator app connected to the user’s account.
- Verification code sent via SMS to the user’s verified mobile device.
- Verification code sent via email to the user’s email address.
The user enters the code as a secondary verification of their identity. After verification, the user doesn’t need to provide this information again, unless they log in from a browser or location that isn’t verified by Salesforce.
But sometimes we require a second level of authentication on every login for stronger identity verification. We can enable Two-factor authentications for users by adding “Two-Factor Authentication for User Interface Logins” permission through a Profile or a Permission Sets.
The following are the verification methods:
- Verification code generated by a mobile authenticator app connected to the user’s account.
- Verification code sent via SMS to the user’s verified mobile device.
- Verification code sent via email to the user’s email address.
Here is an example of two-factor authentication using login flow, which will send an one-time password (OTP) via email to the user’s email address.
- Create an Apex class “OTPGenerator”:
This class provides a random 6 digit “one-time password”(OTP).global class OTPGenerator implements Process.Plugin { global Process.PluginResult invoke(Process.PluginRequest request) { Map<String, Object> result = new Map<String, Object>(); String rand = string.valueof(Math.abs(Crypto.getRandomInteger())); String otp = rand.substring(0,6); result.put('OTP', otp); return new Process.PluginResult(result); } global Process.PluginDescribeResult describe() { Process.PluginDescribeResult result = new Process.PluginDescribeResult(); result.description = 'This plug-in generates a radnom 6-digits code'; result.tag = 'Identity'; result.inputParameters = new List<Process.PluginDescribeResult.InputParameter> {}; result.outputParameters = new List<Process.PluginDescribeResult.OutputParameter> { new Process.PluginDescribeResult.OutputParameter('OTP', Process.PluginDescribeResult.ParameterType.STRING) }; return result; } } - Click on Setup | App Setup | Create | Workflows & Approvals | Flows
- Click on New Flow, it will open flow canvas.
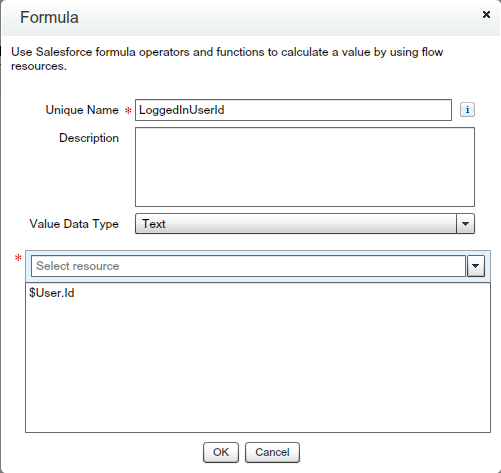
- Create “LoggedInUserId” Formula – Drag and drop Formula from Resources – Give the Unique name “LoggedInUserId” – And put the value “$User.Id” as shown in the below screenshot.
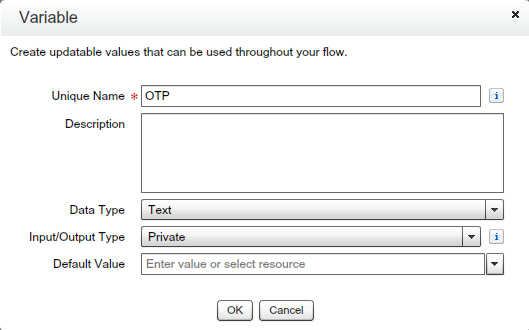
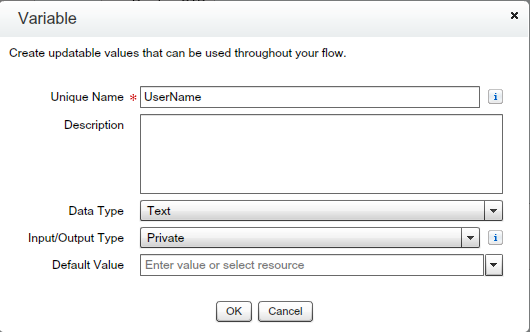
- Create “OTP” Variable – Drag-and-drop Variable from Resources – Give the Unique name “OTP” as shown in the below screenshot.
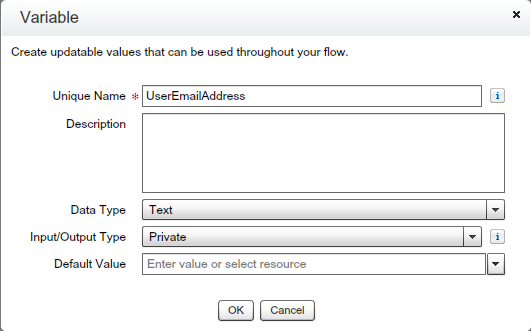
- Create “UserEmailAddress” Variable – Drag and drop Variable from Resources – Give the Unique name “UserEmailAddress” as shown in the below screenshot.
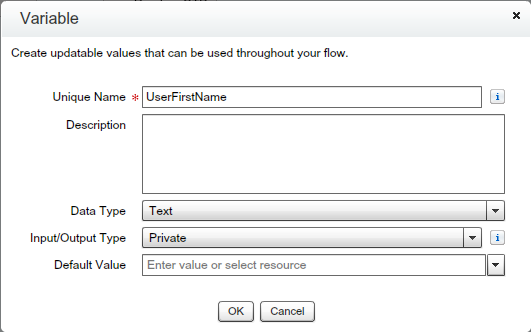
- Create “UserFirstName” Variable – Drag and drop Variable from Resources – Give the Unique name “UserFirstName” as shown in the below screenshot.
- Create “UserName” Variable – Drag and drop Variable from Resources – Give the Unique name “UserName” as shown in the below screenshot.
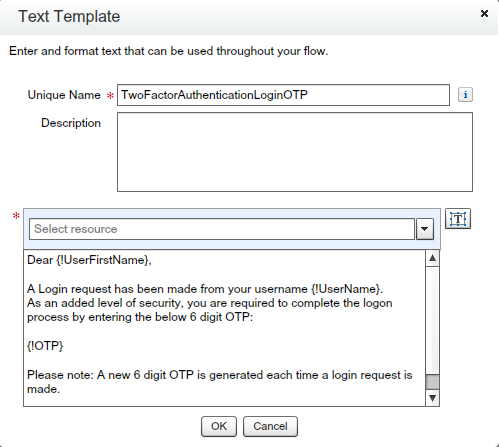
- Create “TwoFactorAuthenticationLoginOTP” Text Template – Drag and drop Text Template from Resources – Give the Unique name “TwoFactorAuthenticationLoginOTP” – And put the “{!OTP}” variable any where in value for OTP as shown in the below screenshot.
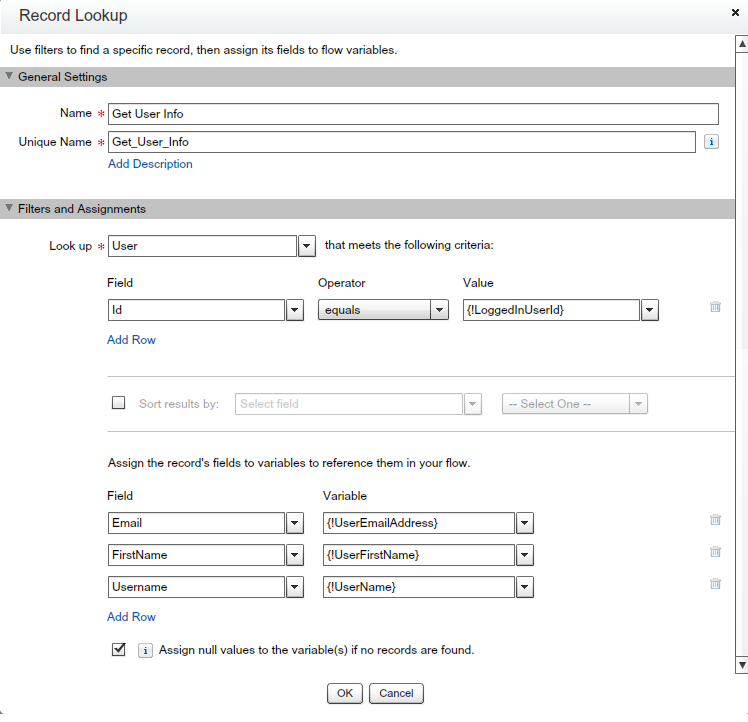
- Drag-and-drop “Record Lookup” from Palette(Data) – Give the Name “Get User Info”.
- In Look Up – Select Standard Object “User”
- Enter criteria Id = {!LoggedInUserId}
- Assign Logged in User field value to variables.
- Email to {!UserEmailAddress}
- FirstName to {!UserFirstName}
- Username to {!UserName}
- Get random 6 digit “one-time password”(OTP) – Drag-and-drop “OTPGenerator” from Palette(Identity) – Give the name “Generate Random OTP”
- Map the Source – Target as OTP – {!OTP} in outputs as shown in the below screenshot.

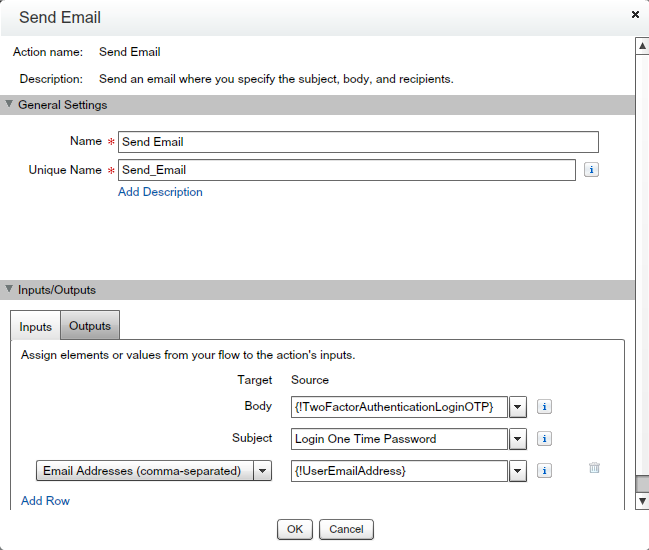
- Send the OTP to the User – Drag-and-drop “Send Email” from Palette(Static Action) – Give the name “Send Email”
- For Body add the Text Template “TwoFactorAuthenticationLoginOTP”.
- Enter Subject “Login One Time Password”.
- For Email Address (Comma-separated) Select {!UserEmailAddress} variable, as shown in the following screenshot.
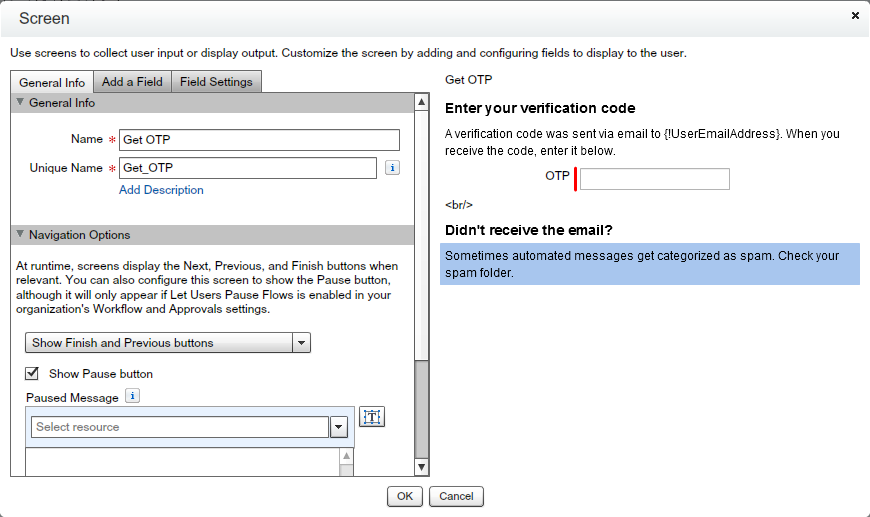
- Now allowing user to enter OTP – Drag and drop “Screen” element from Palette(User Interface) – Give the name “Get OTP”
- Add a Textbox to enter OTP – Give Unique name “OTPInput” as shown in the below screenshot.
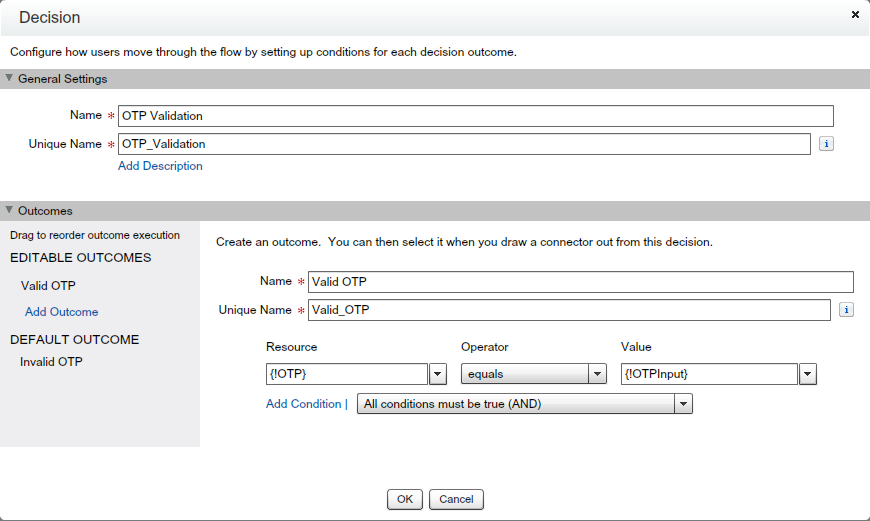
- To verify OTP(Generated by “OTPGenerator” Class) – Drag and drop “Decision” element from Palette(Logic) – Give the name “OTP Validation”. On the window to check whether variable {!OTP} is equal to Screen Input element {!OTPInput}. If both the values is not same, then it means don’t allow user to login into Salesforce.
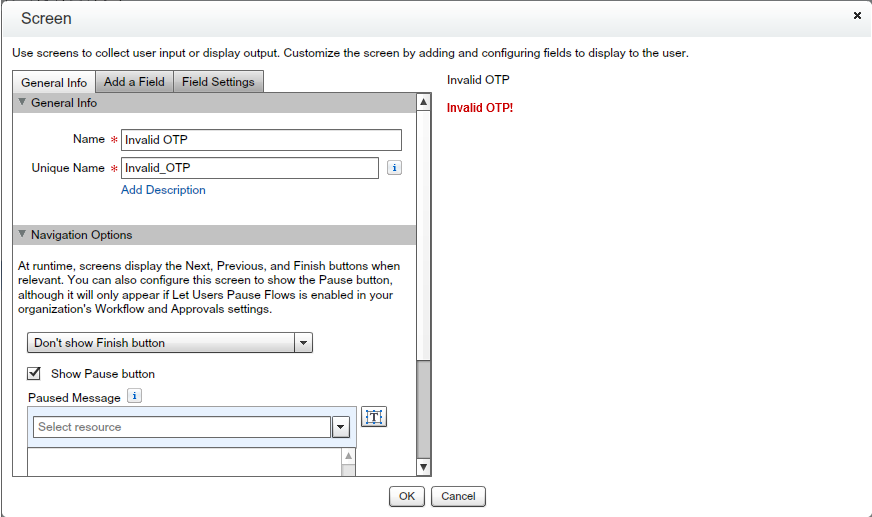
- For invalid OTP add a screen to show error message – Drag and drop “Screen” element from Palette(User Interface) – Give the name “Invalid OTP”
- Add a “Display Message” – Give the name “InvalidTitle” – With the value “Invalid OTP!” as shown in the below screenshot.
- Set “Record Lookup” (Get User Info) element as Start element as shown in below screenshot.

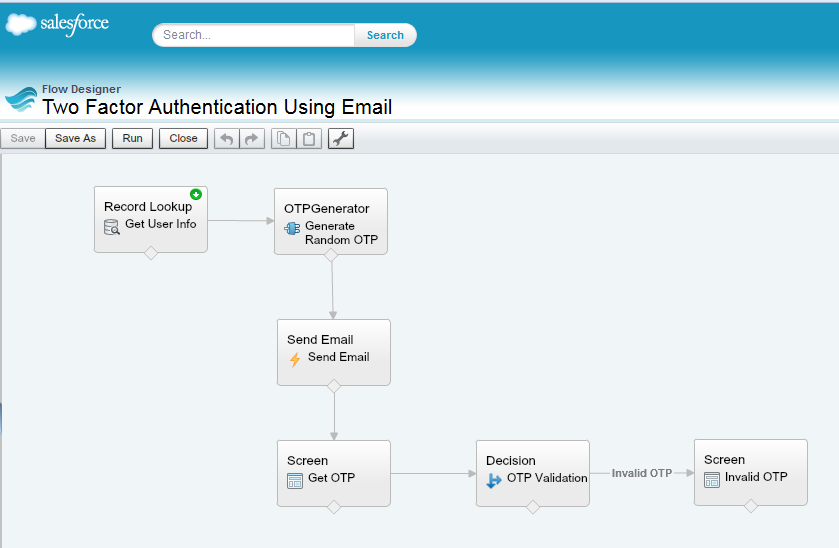
- Finally the Flow will look like the following screenshot.
- Save the flow with name “Two Factor Authentication Using Email” then Activate it and close the canvas.
- Now To create a Login Flow follow the below instructions:
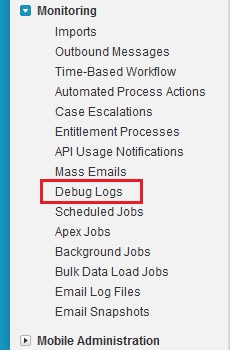
- Click on Name | Setup | Administration Setup | Security Controls | Login Flows
- Click on the New button.
- Enter the Login Flow Name, Select the flow, User license and Profile, It will look like the below screenshot.

Now its time to test the “Two Factor Authentication”. To test it follow the below instructions:
- Login into Salesforce through User who have same profile that you have used in Login Flow, In my case it’s “Custom Standard User”. After Successful login you will receive an email, it will look like the below screenshot.

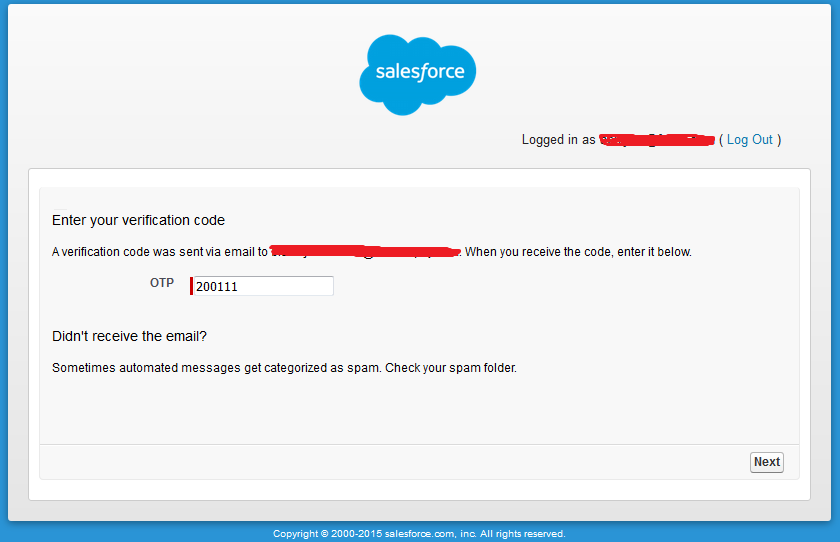
- Enter OTP(One-time Password) onto the screen input field (i.e. OTP) and click on the Next Button, as shown in the below screenshot.
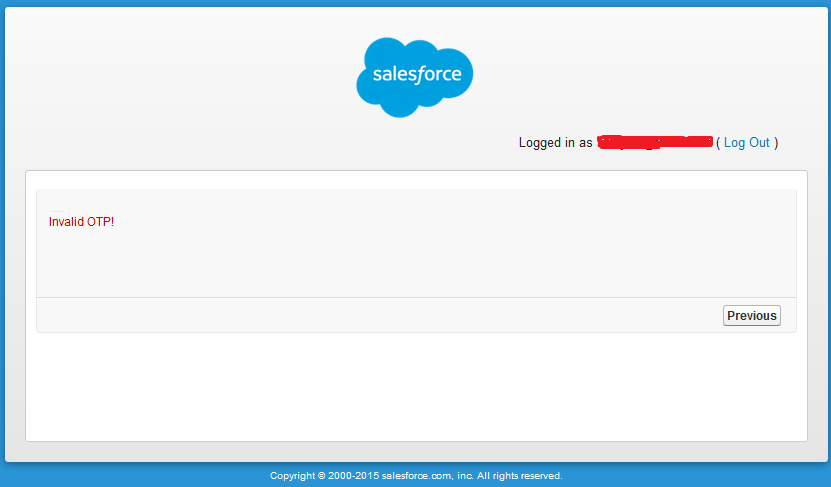
- If Security Code is matched then you will redirect to Salesforce Home Page else it will display an error message as shown in the below screenshot.
Note : I will suggest to implement and test it in your Developer or Sandbox org, and then move it to Production.