Tag Archives: Force.com

Test Class for Batch Apex in Salesforce

Batch Class:

global class BatchAccount implements Database.Batchable<sObject> 
{
    global Database.QueryLocator start(Database.BatchableContext BC) {
		
        return Database.getQueryLocator('SELECT Id,Name FROM Account');
    }
	
    global void execute(Database.BatchableContext BC, List<Account> scope) {
		
        for(Account a : scope)
        {
            a.Name = a.Name + ' Updated';
        }
        update scope;
    }
	
    global void finish(Database.BatchableContext BC) {
		
    }
}

Test Class:

@isTest 
public class BatchAccountTest 
{
    static testMethod void test() 
    {
        List<Account> accList = new List<Account>();
        for(Integer i = 0 ; i < 200; i++)
        {
            Account acc = new Account();
            acc.Name = 'Name' + i;
            accList.add(acc);
        }
        Insert accList;
        
		Test.startTest();
		BatchAccount obj = new BatchAccount();
		DataBase.executeBatch(obj); 
		Test.stopTest();
		
		//Verify accounts updated
		List<Account> accUpdatedList = [SELECT Id, Name FROM Account];
		System.assert(accUpdatedList[0].Name.Contains('Updated'));
    }
}

Select All Checkbox Using Javascript in Visualforce Page

Controller:

public with sharing class Sample { 

    public List<AccountWrapper> accountWrapperList {get; set;}
    
    public Sample (){
        if(accountWrapperList == null) {
            accountWrapperList = new List<AccountWrapper>();
            for(Account a: [SELECT Id, Name From Account Limit 10]) {
                accountWrapperList.add(new AccountWrapper(a));
            }
        }
    }
     
    public class AccountWrapper {
        public Account acc {get; set;}
        public Boolean isSelected{get; set;}
 
        public AccountWrapper(Account a) {
            acc = a;
            isSelected = false;
        }
    }  
    
}

Visualforce Page:

<apex:page controller="Sample" sidebar="false" showHeader="false">
    <script type="text/javascript">
        function selectAllCheckboxes(obj,InputID){
            var inputCheckBox = document.getElementsByTagName("input");    
            for(var i=0; i<inputCheckBox.length; i++){          
                if(inputCheckBox[i].id.indexOf(InputID)!=-1){                                     
                    inputCheckBox[i].checked = obj.checked;
                }
            }
        }
    </script>
    <apex:form >
        <apex:pageBlock >
            <apex:pageBlockTable value="{!accountWrapperList}" var="a" id="table" title="All Accounts">
                <apex:column >
                    <apex:facet name="header">
                        <apex:inputCheckbox onclick="selectAllCheckboxes(this,'inputId')"/>
                    </apex:facet>
                    <apex:inputCheckbox value="{!a.isSelected}" id="inputId"/>
                </apex:column>
                <apex:column value="{!a.acc.Name}" />
            </apex:pageBlockTable>
        </apex:pageBlock>
    </apex:form>
</apex:page>

Output:

TestVisible annotation in Salesforce

TestVisible annotation allow test methods to access private or protected members of another class outside the test class. These members include methods, member variables, and inner classes. This annotation enables a more permissive access level for running tests only. This annotation doesn’t change the visibility of members if accessed by non-test classes.

With this annotation, you don’t have to change the access modifiers of your methods and member variables to public if you want to access them in a test method. For example, if a private member variable isn’t supposed to be exposed to external classes but it should be accessible by a test method, you can add the TestVisible annotation to the variable definition.

This example shows how to annotate a private class member variable and private method with TestVisible and how to access it in test class.

Sample Class:

public class TestVisibleExample {
    //Private member variable
    @TestVisible private static Integer recordNumber = 1;

    //Private method
    @TestVisible private static void updateRecord(String name) {
        // Do something
    }
}    

Test Class:

@isTest
private class TestVisibleExampleTest {
    @isTest static void test1() {
        // Access private variable annotated with TestVisible
        Integer i = TestVisibleExample.recordNumber;
        System.assertEquals(1, i);

        // Access private method annotated with TestVisible
        TestVisibleExample.updateRecord('RecordName');
        // Perform some verification
    }
}

Junction Object in Salesforce

A custom object with two master-detail relationships is called Junction Object. Junction objects are used to create many to many relationships between objects. A many-to-many relationship allows each record of one object to be linked to multiple records from another object and vice versa. One Object can have only two Master-Detail relationships.

For example, Let us assume that we have two custom objects – A and B. To provide the many to many relationship between A and B, we will need to create one more object let’s say it would be C, it will be called as junction object.

The first master-detail relationship you create on your junction object becomes the primary relationship. This affects the following for the junction object records:

Look and feel: The junction object’s detail and edit pages use the color and any associated icon of the primary master object.

Record ownership: The junction object records inherit the value of the Owner field from their associated primary master record. Because objects on the detail side of a relationship do not have a visible Owner field, this is only relevant if you later delete both master-detail relationships on your junction object.

Division: If your organization uses divisions to segment data, the junction object records inherit their division from their associated primary master record. Similar to the record ownership, this is only relevant if you later delete both master-detail relationships.

Note:

  • If we delete record A (First Master detail relationship is always primary) – then child record c will be deleted.
  • If we delete record B then in this case also child record C will be deleted.
  • If we delete record C then only C will be deleted , master record will not be deleted.
  • If child C has two Master record A and B, Where A is primary relation then Child record C will inherit the look and feel of Parent object A.

Salesforce Apex Sharing Reason

Apex sharing reason is used to identify, why the record are shared with the user. If a developer is doing any operation on that record sharing then he can able to identify, in which sharing records he needs to do the operation. Its especially for managing a record sharing through apex code. We can share a record multiple times with the same user or group using different Apex sharing reasons.

Lets go through this with below example.

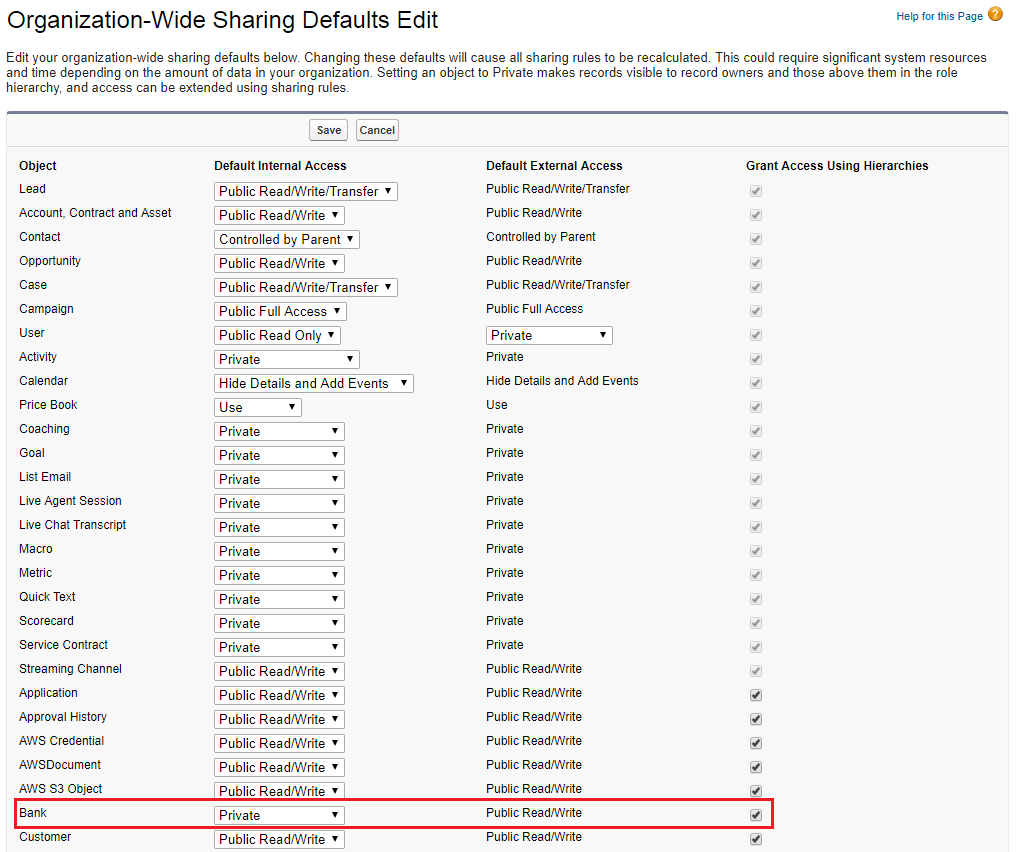
Here I’ve a custom object “Bank” and the OWD of this object is set as “private” under the “Security control” for users.

If an object OWD is set as “private”, then user have access to the object records which is created by himself. Once you made this change “Sharing” button will be added into the “Bank” page layout. By using this Sharing button you can able to view the record access which means who have access to that records.

But here I will explain you how to extend the records access(Sharing the record) to users or group through apex code.

Here for “Bank” custom object the OWD is set as “private” under the “Security control” for users.

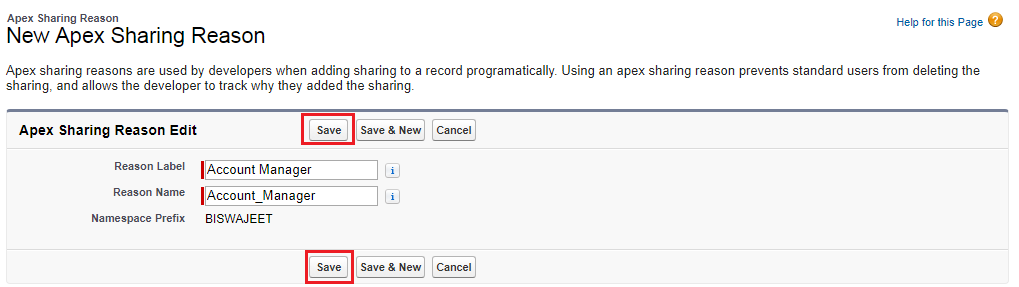
In “Bank” custom object in Apex Sharing Reason related list, I’ve created an Apex Sharing Reason as “Account Manager”.

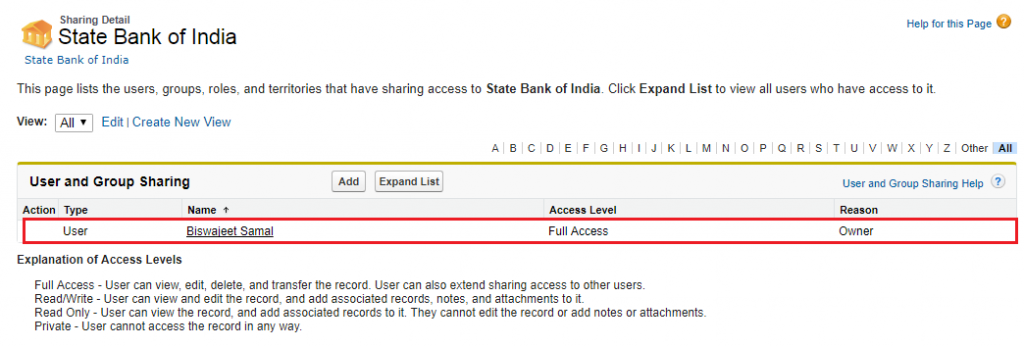
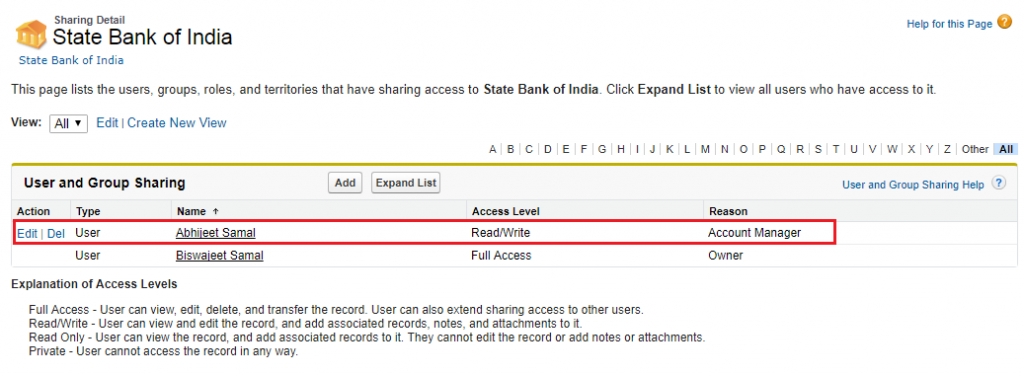
In my org I have a user called Abhijeet. He is the Account Manager. If any Bank record is created by an user then that record should shared using apex with the Account Manager Abhijeet. Suppose Biswajeet is creating a Bank record called “State Bank of India” then that record should be shared with Abhijeet.

Here is the “State Bank of India” record, and record owner is Biswajeet.

Using below apex code we can share this record with Abhijeet. In below apex code “UserOrGroupId” is Abhijeet UserId and “ParentId” is “State Bank of India” record Id.

Bank__Share objBank = new Bank__Share();
objBank.AccessLevel = 'Edit'; //Access Level
objBank.UserOrGroupId = '00590000002Qi1f';//UserId or Public Group Id
objBank.ParentID = 'a0B9000000yNgXo';//Object Record Id
objBank.RowCause = Schema.Bank__Share.RowCause.Account_Manager__c;//Record Sharing Reason
Insert objBank;

Salesforce displays Apex sharing reasons in the Reason column when viewing the sharing for a custom object record in the user interface. This allows users and administrators to understand the purpose of the sharing. After executing above apex code the output will look like below snap.

Note:

  • Only users with the “Modify All Data” permission can add, edit, or delete sharing that uses an Apex sharing reason.
  • Deleting an Apex sharing reason will delete all sharing on the object that uses the reason.
  • You can create up to 10 Apex sharing reasons per custom object.
  • You can create Apex sharing reasons using the Metadata API.