System Events in Lightning Framework

System events are fired automatically by the Lightning framework such as during component initialization, attribute value change, rendering etc. All Components can register for system events in their HTML markup.

We can handle these events in the Lightning apps or components, and within the Salesforce mobile app. Here are few examples of system events.

Event Name Description
aura:doneRendering Indicates that the initial rendering of the root application has completed.
aura:doneWaiting Indicates that the app is done waiting for a response to a server request.
aura:locationChange Indicates that the hash part of the URL has
changed.
aura:noAccess Indicates that a requested resource is not accessible due to
security constraints on that resource.
aura:systemError Indicates that an error has occurred.
aura:valueChange Indicates that an attribute value has
changed.
aura:valueDestroy Indicates that a component has been
destroyed.
aura:valueInit Indicates that an app or component has been
initialized.
aura:valueRender Indicates that an app or component has been rendered or
rerendered.
aura:waiting Indicates that the app is waiting for a response to a server request.

Set CreatedDate Field Value for Test Class Records in Salesforce

As of Spring ’16 release, we can now set the Created date field value for the test records in Salesforce test classes using setCreatedDate(Id recordId, Datetime createdDatetime) method.

Example:

@isTest   
private class SampleTest {  
    static testMethod void testSetCreatedDate() {  
        Account acc = new Account(Name='Test Account');  
        Insert acc;
        Datetime yesterday = Datetime.now().addDays(-1);
        Test.setCreatedDate(acc.Id, yesterday);  
        Test.startTest();  
        Account testAcc = [SELECT Id, Name, CreatedDate FROM Account WHERE Name ='Test Account' LIMIT 1];  
        System.assertEquals(testAcc.CreatedDate, yesterday);  
        Test.stopTest();  
    }  
}  

Note:

  • All database changes are rolled back at the end of a test. We can’t use this method on records that existed before the test executed.
  • We also can’t use setCreatedDate in methods annotated with @isTest(SeeAllData=true), because those methods have access to all data in the org.
  • The both parameters (Id recordId, Datetime createdDatetime) of this method are mandatory.

Delete Apex Class or Trigger in Salesforce Production Org Using Eclipse

It is not possible to directly delete an Apex class or trigger after it has been deployed to production. Here are the steps to delete apex class or trigger in Salesforce Production Org by using eclipse and Force.com IDE.

  • Download and Install the Force.com IDE for Eclipse.
  • Connect to the Salesforce Production org.
  • Download the apex class/trigger.
  • Open the meta.xml file of the Apex class/trigger.
  • Change the status of the Apex class/trigger to Deleted.
  • Save and deploy to server.

Note: Apex class status can only be changed to “Active” or “Deleted” and not “Inactive”.

Custom Permissions in Salesforce

Custom permission is one of the Salesforce features to grant user access to custom processes or apps. In Salesforce, many features require access checks that specify which users can access certain functions. Permission set and profiles settings include built-in access settings for many entities, like objects, fields, tabs, and Visualforce pages. However, permission sets and profiles don’t include access for some custom processes and apps.

Custom permissions will allow to define access checks that can be assigned to users via permission sets or profiles, similar to how you assign user permissions and other access settings.

These are the ways to query Custom Permissions:

  • To determine which users have access to a specific custom permission, use SOQL with the SetupEntityAccess and CustomPermission sObjects.
  • To determine what custom permissions users have when they authenticate in a connected app, reference the user’s Identity URL, which Salesforce provides along with the access token for the connected app.

Here is an example to implement “Custom Permissions” in “Custom Button”. In below example I’ve implemented a “Custom Javascript Details Button” to deactivate account record. Some specific Profile Users have permission to deactivate the account record.

For that I have to check all profile in “Custom Button” or I’ve to create a Permission Set to check it (For Permission Set I’ve to write SOQL query).

Instead of doing this, If I’ll create one “Custom Permission” and assign that permission to those profiles, then I can only check the access of “Custom Permission” in “Custom Button”, and if the user has access to the “Custom Permission”, then User can deactivate account records.

  • Go to Setup, enter Custom Permissions in the Quick Find box, then select Custom Permissions.
  • Click New.
  • Enter the permission information:
    Label : The permission label that appears in permission sets
    Name : The unique name that’s used by the API and managed packages
    Description (Optionally) : A description that explains what functions the permission grants access to.
    Connected App (Optionally) : The connected app that’s associated with this permission.
  • Click Save.

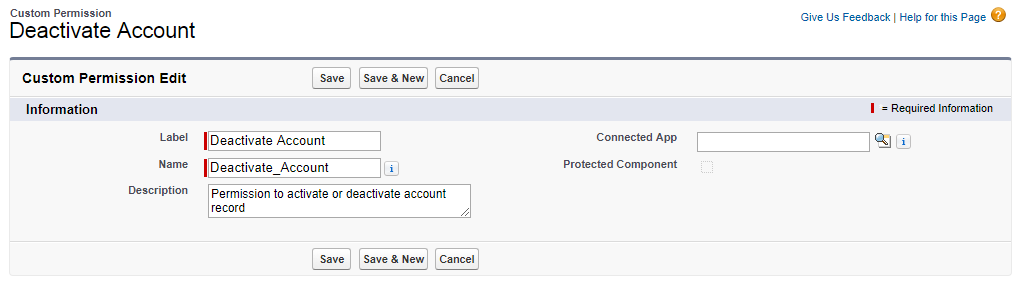
Create Custom Permission “Deactivate Account”:

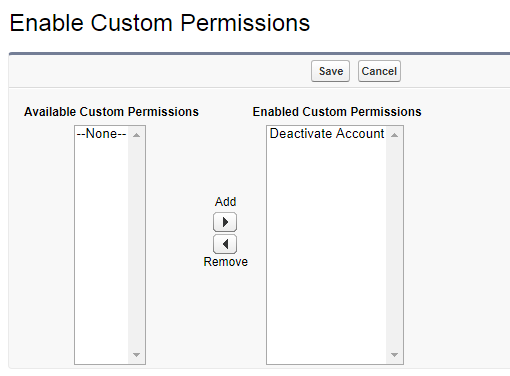
Assigned the above Custom Permission “Deactivate Account” to Profiles:
Go to Setup || Profiles || Select Profile || Enabled Custom Permissions || Edit || Add Custom Permissions to the Profile.

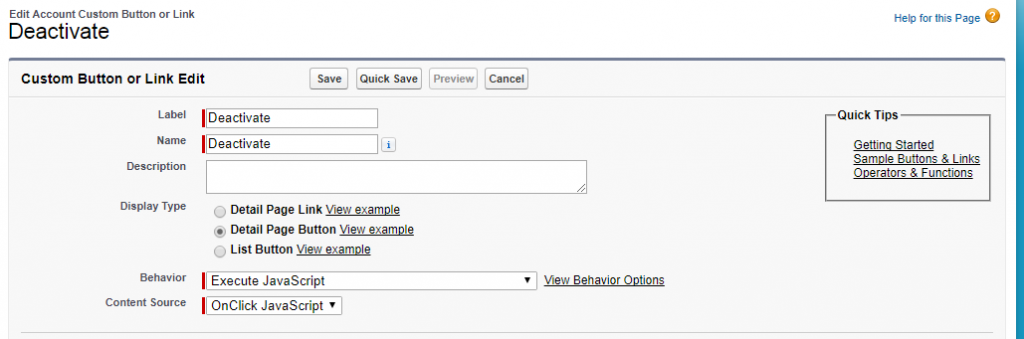
Now create a “Custom JavaScript Details Button” on Account object:

JavaScript Code:
Here I’m checking $Permission.Deactivate_Account Custom Permission.

{!RequireScript("/soap/ajax/32.0/connection.js")}
if ({!$Permission.Deactivate_Account}) {
    var record = new sforce.SObject("Account");
    record.Id = "{!Account.Id}";
    record.Active__c = false;
    var results = sforce.connection.update([record]);
    if (!results[0].getBoolean("success")) {
        alert("Error: " + results[0].errors[0].message);
    } else {
        alert("Account deactivated successfully");
    }
    window.location.reload();
} else {
    alert("You don't have access to this feature.");
}