Category Archives: Salesforce

Set CreatedDate Field Value for Test Class Records in Salesforce

As of Spring ’16 release, we can now set the Created date field value for the test records in Salesforce test classes using setCreatedDate(Id recordId, Datetime createdDatetime) method.

Example:

@isTest   
private class SampleTest {  
    static testMethod void testSetCreatedDate() {  
        Account acc = new Account(Name='Test Account');  
        Insert acc;
        Datetime yesterday = Datetime.now().addDays(-1);
        Test.setCreatedDate(acc.Id, yesterday);  
        Test.startTest();  
        Account testAcc = [SELECT Id, Name, CreatedDate FROM Account WHERE Name ='Test Account' LIMIT 1];  
        System.assertEquals(testAcc.CreatedDate, yesterday);  
        Test.stopTest();  
    }  
}  

Note:

  • All database changes are rolled back at the end of a test. We can’t use this method on records that existed before the test executed.
  • We also can’t use setCreatedDate in methods annotated with @isTest(SeeAllData=true), because those methods have access to all data in the org.
  • The both parameters (Id recordId, Datetime createdDatetime) of this method are mandatory.

Custom Permissions in Salesforce

Custom permission is one of the Salesforce features to grant user access to custom processes or apps. In Salesforce, many features require access checks that specify which users can access certain functions. Permission set and profiles settings include built-in access settings for many entities, like objects, fields, tabs, and Visualforce pages. However, permission sets and profiles don’t include access for some custom processes and apps.

Custom permissions will allow to define access checks that can be assigned to users via permission sets or profiles, similar to how you assign user permissions and other access settings.

These are the ways to query Custom Permissions:

  • To determine which users have access to a specific custom permission, use SOQL with the SetupEntityAccess and CustomPermission sObjects.
  • To determine what custom permissions users have when they authenticate in a connected app, reference the user’s Identity URL, which Salesforce provides along with the access token for the connected app.

Here is an example to implement “Custom Permissions” in “Custom Button”. In below example I’ve implemented a “Custom Javascript Details Button” to deactivate account record. Some specific Profile Users have permission to deactivate the account record.

For that I have to check all profile in “Custom Button” or I’ve to create a Permission Set to check it (For Permission Set I’ve to write SOQL query).

Instead of doing this, If I’ll create one “Custom Permission” and assign that permission to those profiles, then I can only check the access of “Custom Permission” in “Custom Button”, and if the user has access to the “Custom Permission”, then User can deactivate account records.

  • Go to Setup, enter Custom Permissions in the Quick Find box, then select Custom Permissions.
  • Click New.
  • Enter the permission information:
    Label : The permission label that appears in permission sets
    Name : The unique name that’s used by the API and managed packages
    Description (Optionally) : A description that explains what functions the permission grants access to.
    Connected App (Optionally) : The connected app that’s associated with this permission.
  • Click Save.

Create Custom Permission “Deactivate Account”:

Assigned the above Custom Permission “Deactivate Account” to Profiles:
Go to Setup || Profiles || Select Profile || Enabled Custom Permissions || Edit || Add Custom Permissions to the Profile.
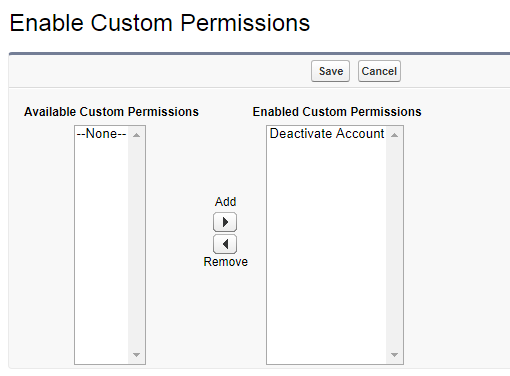
Now create a “Custom JavaScript Details Button” on Account object:

JavaScript Code:
Here I’m checking $Permission.Deactivate_Account Custom Permission.

{!RequireScript("/soap/ajax/32.0/connection.js")}
if ({!$Permission.Deactivate_Account}) {
    var record = new sforce.SObject("Account");
    record.Id = "{!Account.Id}";
    record.Active__c = false;
    var results = sforce.connection.update([record]);
    if (!results[0].getBoolean("success")) {
        alert("Error: " + results[0].errors[0].message);
    } else {
        alert("Account deactivated successfully");
    }
    window.location.reload();
} else {
    alert("You don't have access to this feature.");
}

Invoking REST API From Visualforce Page

Usually we make Rest API calls from Salesforce to External systems to get the data or to pass the updates to External Systems, using Apex class. But sometimes we can have a situation, like where we need to make a call to external systems from the visual force page.

Salesforce has introduced a concept called AJAX ToolKit, which help us to make REST API call from the JavaScript in Visualforce Page. Here is an example to invoke REST API from Visualforce Page. In below example I’m using https://exchangeratesapi.io/ web service HTTP callout and send a GET request to get the foreign exchange rates. The foreign exchange rates service sends the response in JSON format.

Visualforce Page:

<apex:page>
    <apex:includeScript value="//code.jquery.com/jquery-1.11.1.min.js" />
    <script>
    function apiCall() {
        //Get a reference to jQuery that we can work with
        $j = jQuery.noConflict();
        //endpoint URL
        var weblink = 'https://api.exchangeratesapi.io/latest?base=USD'; 
        
        $j.ajax({
            url: weblink,
            type: 'GET', //Type POST or GET
            dataType: 'json',
            beforeSend: function(request) {
                //Add all API Headers here if any
                //request.setRequestHeader('Type','Value');
            },
            
            crossDomain: true,
            //If Successfully executed 
            success: function(result) {
                //Response will be stored in result variable in the form of Object.
                console.log('Response Result' + result);
                
                //Convert JSResponse Object to JSON response
                var jsonResp = JSON.stringify(result);
                document.getElementById("apiData").innerHTML = jsonResp;
            },
            
            //If any Error occured
            error: function(jqXHR, textStatus, errorThrown) {
                //alert('ErrorThrown: ' + errorThrown);
            }
        });
    }
    </script>
    <apex:form>
        <!--call javaScript-->
        <input type="button" value="Call API" onclick="apiCall()" />
        <div id="apiData">
        </div>
    </apex:form>
</apex:page>

Salesforce Lightning Progress Bar

lightning:progressBar component displays the progress of an operation from left to right, like a file download or upload.

Here is an example loads the progress bar on load of the component, and in the JS controller that changes the value of the progress bar.

Lightning Component:

<!--ProgressBar.cmp-->
<aura:component>
     <!--declare handler for render the JS method for Progress bar-->
    <aura:handler name="init" value="{!this}" action="{!c.doInit}"/>
     <!--declare attributes for progress bar value-->
    <aura:attribute name="progress" type="Integer" default="0"/>
    <div class="slds-m-around_xx-large">
        <!--Lightning Progress Bar-->
        <lightning:progressBar value="{!v.progress}"/>
    </div>  
</aura:component>

Lightning Component JS Controller:

({
    //Specifying progress === 100 ? clearInterval(interval) : progress + 20 increases
    //the progress value by 20% and stops the animation when the progress reaches 100%
    //The progress bar is updated every 1000 milliseconds.
    doInit:  function (component, event, helper) {
        var interval = setInterval($A.getCallback(function () {
            var progress = component.get('v.progress');
            component.set('v.progress', progress === 100 ? clearInterval(interval) : progress + 20);
        }), 1000);
    }
})

Output: